# Creating a Starter Kit
Thinking of creating your own Statamic Starter Kit? Here's everything you need to know to get started.
## Overview
Starter Kit development happens within a real instance of Statamic, just like developing any other Statamic site using your normal, preferred workflows.
A released Starter Kit package contains **only** the files relevant to the Kit itself, and not a full Statamic/Laravel instance. Our Import/Export tools will allow you to maintain **only those relevant files**, without having to worry about maintaining the Statamic and underlying Laravel instances as they get updated over time.
The **Export** command will export all the files and directories you've created or configured to a new location. It's this directory that becomes the package, and is the thing you should version control, not the sandbox instance.
For example, maybe you are creating a pre-built, theme-style Starter Kit, the high-level workflow might look like this:
1. Create a new Statamic project.
2. Initialize it as a Starter Kit:
```shell
php please starter-kit:init
```
3. Develop the theme as you normally would.
4. Export the theme to a separate repo for redistribution.
``` shell
php please starter-kit:export ../kung-fury-theme
```
5. Publish to [Github](https://github.com/), [Gitlab](https://gitlab.com/), or [Bitbucket](https://bitbucket.org/).
6. Install into new Statamic projects.
``` shell
php please starter-kit:install the-hoff/kung-fury-theme
```
## Creating the Starter Kit project
The first step is to [create a new Statamic project](/installing.md#creating-a-new-statamic-project). This is essentially a throwaway sandbox that you will use to develop and test your Starter Kit.
Run the `init` command to generate the appropriate files.
```shell
php please starter-kit:init
```
This command will create and wire up a `package` directory, which represents the eventual Starter Kit repository's root directory.
## The Starter Kit package
Starter Kits are installed via Composer. You can control the package's contents via the `package` directory, which will be the exported repository's root directory.
At a minimum, your `package` directory needs a `starter-kit.yaml` and a `composer.json` file.
``` files theme:serendipity-light
app/
content/
config/
package/ #[tl! ++]
composer.json #[tl! ++]
starter-kit.yaml #[tl! ++]
public/
resources/
composer.json
```
You can also include other files like a `README.md`, etc. as well. Everything you put into this `/package` folder will be exported to your repository's root directory.
``` files theme:serendipity-light
package/
composer.json
starter-kit.yaml
README.md #[tl! ++]
```
:::tip
If you want a separate `README.md` to be installed when the end user installs your Starter Kit into their app, you can export the `README.md` at the root of your development sandbox by adding it to [export_paths](http://docs.test/starter-kits/creating-a-starter-kit#exporting-paths).
:::
Finally, if you plan to [make your Starter Kit updatable](#making-starter-kits-updatable), you should require this as a path repository.
```json
{
"name": "statamic/statamic",
"require": [
"the-hoff/kung-fury-theme": "dev-master" // [tl! ++]
],
"repositories": [ // [tl! ++:start]
{
"type": "path",
"url": "package"
}
] // [tl! ++:end]
}
```
:::tip
This `package` folder can be automatically scaffolded and wired up in your composer `repositories` by [running the init command](#creating-the-starter-kit-project) to create your Starter Kit project.
:::
## Exporting
When ready to export your Starter Kit, run the following command:
``` shell
php please starter-kit:export {export_repo_path}
```
This will copy and arrange the appropriate files into the given directory that will be used as a distributable on GitHub, GitLab, Bitbucket, Composer, etc.
:::tip
Think of the exported directory similar to a compiled assets directory when using a build tool like Vite. You generate files into this directory and shouldn't touch it manually.
:::
### Exporting Paths
Any files that you modify on your site that you intend to be installed into a Statamic project should be marked as `export_paths` in your `starter-kit.yaml` file.
For example, the following config would tell Statamic to export sample content, along with related assets, config, blueprints, css, views, and front-end build config out for distribution on the Statamic Marketplace.
``` yaml
export_paths:
- content
- config/filesystems.php
- config/statamic/assets.php
- resources/blueprints
- resources/css/site.css
- resources/views
- public/assets
- public/css
- package.json
- vite.config.js
```
Anything not configured in your `starter-kit.yaml` **will not be exported**. This way you don't have to maintain a full Statamic site, or any bootstrap code that is unrelated to your Starter Kit.
Once your export paths are configured, re-run the above `starter-kit:export` command. Your files should now be available at your new export repo path.
#### Clearing stale files
Re-running the export command will overwrite files in your export repo, but it _won't_ remove files that you've since deleted or renamed in your sandbox project. To wipe your configured `export_paths` in the destination before re-exporting, pass the `--clear` flag:
``` shell
php please starter-kit:export ../kung-fury-theme --clear
```
Since this is destructive, it's opt-in. Review the resulting git diff in your export repo before committing — anything outside your `export_paths` (like `.github`, the stubbed `composer.json`, etc.) is left untouched, so you can discard any overzealous changes before pushing.
### Exporting dependencies
If you wish to bundle any of your installed Composer dependencies with your Starter Kit, just `composer require` them in your sandbox project as you would into any app, then add them under a `dependencies` array in your `starter-kit.yaml` config file:
``` yaml
dependencies:
- statamic/ssg
```
The exporter will automatically detect the installed versions and whether or not they are installed as dev dependencies, and export accordingly.
When [installing the Starter Kit](#installing-a-starter-kit), composer will install with the same version constraints as you had installed in your sandbox project during development.
## Optional modules
You may also present an optional set of Starter Kit files, nested under `modules` in your `starter-kit.yaml` config file.
For example, here we'll configure an opt-in `seo` module.
```yaml
modules:
seo:
dependencies:
- statamic/seo-pro
```
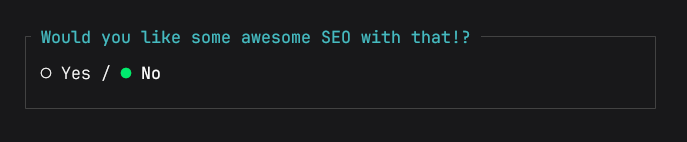
This presents a choice to the user, to confirm whether or not to install this module.
These modules are compatible with the same config options that you use at the top level of your config file (ie. `export_paths`, `dependencies`, etc.).
```yaml
modules:
seo:
export_paths:
- resources/css/seo.css
dependencies:
- statamic/seo-pro
```
### Customizing Prompt Text
If you don't like the default prompt text, you can customize it with custom `prompt` config.
```yaml
modules:
seo:
prompt: 'Would you like some awesome SEO with that!?'
dependencies:
- statamic/seo-pro
```
Would you also like fries with that?
### Customizing prompt default value
Setting `default: true` will ensure the module is installed by default if the user spams the enter key through the prompt, or the Starter Kit is installed non-interactively.
```yaml
modules:
seo:
default: true
dependencies:
- statamic/seo-pro
```
### Skipping confirmation
Or maybe you wish to skip the user prompt and always install a given module, using modules to better organize larger Starter Kit configs. To do this, simply set `prompt` to false.
```yaml
modules:
seo:
prompt: false
```
### Selecting between modules
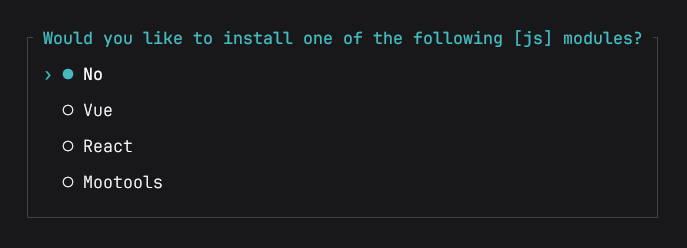
You may find yourself in a situation where you want the user to select only one of multiple module options. To do this, you may nest multiple module configs under an `options` object.
```yaml
modules:
js:
options:
vue:
export_paths:
- resources/js/vue.js
react:
export_paths:
- resources/js/react.js
mootools:
export_paths:
- resources/js/mootools.js
```
### Customizing select module prompt text
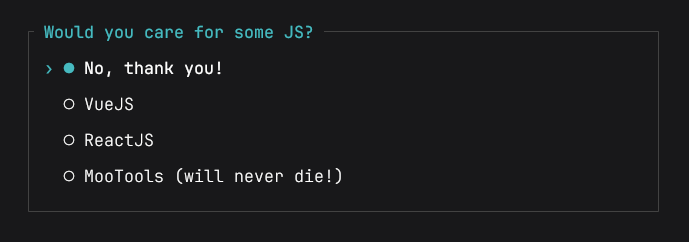
Of course, you can also customize `prompt` text, the first 'No' `skip_option` text, as well as each option `label`, as you see fit.
```yaml
modules:
js:
prompt: 'Would you care for some JS?'
skip_option: 'No, thank you!'
options:
vue:
label: 'VueJS'
export_paths:
- resources/js/vue.js
react:
label: 'ReactJS'
export_paths:
- resources/js/react.js
mootools:
label: 'MooTools (will never die!)'
export_paths:
- resources/js/mootools.js
```
🐮🐮🐮
### Customizing select module default value
Setting a `default` value will ensure a specific module option is installed by default if the user spams the enter key through the prompt, or the Starter Kit is installed non-interactively.
```yaml
modules:
js:
prompt: 'Would you care for some JS?'
default: vue
# ...
```
### Disabling select module skip option
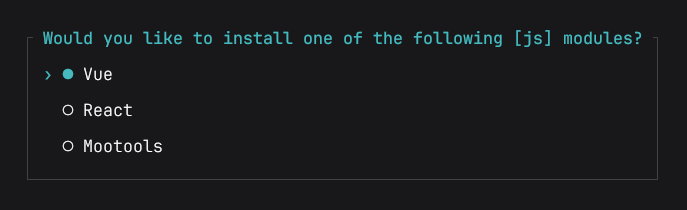
If you want to force the user to select a module option, you can set `skip_option: false` to disable the 'No' skip option.
```yaml
modules:
js:
prompt: 'Would you care for some JS?'
skip_option: false
# ...
```
### Nesting modules
Finally, you can also nest modules where it makes sense to do so. Simply nest a `modules` object within any module.
```yaml
modules:
seo:
prompt: 'Would you like some awesome SEO with that!?'
dependencies:
- statamic/seo-pro
modules:
sitemap:
prompt: 'Would you like additional SEO sitemap features as well?'
dependencies:
- statamic/seo-pro-sitemap
```
In this example, the second `sitemap` module prompt will only be presented to the user, if they agree to installing the parent `seo` module.
## Post-install hooks
You may run additional logic after the Starter Kit is installed. For example, maybe you want to output some information.
To do so, you can create a `StarterKitPostInstall.php` file in the root of your Starter Kit. It should be a simple non-namespaced class with a `handle` method. You will be provided with an instance of the command so you can output lines, get input, and so on.
```php
line('Thanks for installing!');
}
}
```
:::tip
Statamic will automatically export this file if it exists. You don't need to add it to export_paths.
:::
## Publishing a Starter Kit
Once exported, you will need to update the `name` property in the `composer.json` created at your specified export repo path. It should match your Composer/GitHub {Organization}/{Repo_Name} exactly.
``` json
{
"name": "the-hoff/kung-fury-theme",
"extra": {
"statamic": {
"name": "Kung Fury Theme",
"description": "Kung Fury Theme Starter Kit"
}
}
}
```
Now create a `README.md` file and push to [Github](https://github.com/), [Gitlab](https://gitlab.com/), or [Bitbucket](https://bitbucket.org/), as you would any PHP package. This is all that is required to publish a free Starter Kit!
:::tip
Unlike addons, you are not required to register on [Packagist](https://packagist.org/).
:::
If you would like to share your Starter Kit, receive more exposure, or would like to charge for your Kit, you should [publish it to the Statamic Marketplace](#publishing-to-the-marketplace).
## Publishing to the Marketplace
Once your Starter Kit is ready for the world, you can publish it on the [Statamic Marketplace](https://statamic.com/marketplace) where it can be discovered by others.
Before you can publish your Starter Kit, you'll need a couple of things:
- A [Statamic Seller Account](https://statamic.com/creator)
- A connected [Stripe](https://stripe.com) account _only if_ you're planning to sell your Starter Kits.
In your seller dashboard, you can create a product. There you'll be able to link your Composer package that you created on Packagist, choose a price, write a description, and so on.
Products will be marked as drafts that you can preview and tweak until you're ready to go.
Once published, you'll be able to see your Starter Kit on the Marketplace and within the Starter Kits area of the Statamic Control Panel.
## Installing from a local repo
To test install your Starter Kit from your local exported repo, you can add the repo's local path to your global Composer `config.json` file as a repository:
```json
{
"repositories": [
{
"type": "path",
"url": "/Users/hasselhoff/kung-fury-theme"
}
]
}
```
:::tip
If you are not sure where your `config.json` is located, run `composer config --global home` to see the location of your global Composer config.
:::
With your repo's local path added to your `config.json`, you should now be able to install using the `--local` cli option:
```
statamic new kung-fury-dev the-hoff/kung-fury-theme --local
```
## Maintaining a Starter Kit
When making changes to your Starter Kit, just [re-export](#exporting) from your development repo and push your changes from your exported repo.
### Keeping up-to-date with Statamic and Laravel
Rather than maintaining your development repo as new Statamic and Laravel versions are released, you can always install your Starter Kit into a fresh Statamic instance by using the `--with-config` install option.
``` shell
statamic new kung-fury-dev the-hoff/kung-fury-theme --with-config
```
This will install your Starter Kit into a brand new Statamic project, along with your `starter-kit.yaml` config file for future exports.
## Making starter kits updatable
As their name implies, starter kits were originally intended to be a way to "start" a site. Once installed, the user is on their own and can customize as they see fit.
The Kit would get installed via Composer, files would get copied to their respective locations, and then the Kit gets removed.
However, you may choose to construct your Kit in a way that it can be updated by the end user. To do that, you should instruct Statamic to leave the Kit required as a Composer dependency by adding `updatable: true` in your `starter-kit.yaml` file:
```yaml
updatable: true #[tl! ++]
export_paths: ...
```
Now that the Kit package stays around after installation, it can be updated like any other Composer package:
```shell
composer update
```
This means that you could do things like:
- Add a service provider to wire up Laravel or Statamic behavior.
- Make the service provider extend AddonServiceProvider to make your Starter Kit _also_ an addon to get behavior for free like autoload tags, modifiers, etc.
- Rather than exporting views, CSS, JS, PHP classes, etc. into the project, you can keep them in the package itself.
## Addons vs. Starter Kits
Both addons and Starter Kits can be used to extend the Statamic experience, but they have different strengths and use cases:
### Addons
- Addons are installed via `composer`, like any PHP package
- Addons live within your app's `vendor` folder after they are installed
- Addons can be updated over time
- Addon licenses are tied to your site
:::tip
An example use case is a custom fieldtype maintained by a third party vendor. Though you would install and use the addon within your app, you would still rely on the vendor to maintain and update the addon over time.
:::
### Starter Kits
- Starter Kits are installed via `statamic new` or `php please starter-kit:install`
- Starter Kits install pre-configured files and settings into your site
- Starter Kits do not live as updatable packages within your apps (by default)
- Starter Kit licenses are not tied to a specific site, and expire after a successful install
:::tip
An example use case is a frontend theme with sample content. This is the kind of thing you would install into your app once and modify to fit your own style. You would essentially own and maintain the installed files yourself.
:::
## Related reading
- [Starter Kit Overview](/starter-kits.md)
- [How to Install a Starter Kit](/starter-kits/installing-a-starter-kit.md)
- [How to Update a Starter Kit](/starter-kits/updating-a-starter-kit.md)