

Quick start guide
A step-by-step guide to installing and building your first Statamic site.
Overview#
Much of the documentation is intended to be used as a reference sheet for various features, explaining how they work and what options and settings they provide. But not this guide. This is for gluing it all together, assuming you know very little about how Statamic works. We'll only make a couple of assumptions here before we get started.
- You are comfortable working with HTML.
- You have a local dev environment with composer installed.
- You can copy and paste a few commands into the command line.
- You have more than 5 minutes to spare. Let's enjoy ourselves here.
What we're building#
We're going to build a simple personal website for a fictitious young aspiring programmer named Kurt Logan. Kurt always has and always will live in the 1980s and is very excited at the prospect of having his very own place in Cyberspace.
This is not a "5 minute quick install guide" – we're going to be building a simple yet full site from scratch so you can see how everything comes together. It will likely take around 20-30 minutes.
High level approach#
A high level approach to building a site in Statamic often looks like this.
- Start with a static HTML site or series of different layouts
- Break static files up into the appropriate views (layouts, templates, and partials)
- Create applicable collections to hold content and set up routes to determine your URL patterns
- Stub out top level pages and map them to the proper templates
- Configure blueprints to hold fields that match your HTML (like title, author, date, content) and move static content out of your markup and into entries using the beautiful UI
- Keep going until your site is done
Once familiar with Statamic, many developers begin building their static site right in Statamic, often blending all the steps into a smooth flowing river of productivity.
Install Statamic#
Let's start right at the very beginning. Installing Statamic.
There are a few ways to do it, but we recommend using our CLI installer. So let's get that installed to your local machine.
composer global require statamic/cli
Now you can run the statamic new command wherever you prefer to keep your site projects (we use ~/Sites but you do you) to get a fresh site up and running.
cd ~/Sites && statamic new cyberspace-place
You'll be asked a couple of questions, like whether you want to install a blank site or a Starter Kit (to keep it really simple, start with a blank site), create your first user, or initialize a Git repository.
Once the installer is done and if everything worked as expected, you should be able to visit http://cyberspace-place.test and see the Statamic welcome screen.
If you encounter any errors, Google them frantically and try anything and everything suggested until it magically begins working.
Just kidding, that's a terrible idea. Please don't do that. You should check our troubleshooting guide and GitHub discussions to look for a validated solution before resorting to such measures. We try our best to have answers to all the most common things you might encounter. Modern web development is amazing when everything is up to date, and can be pretty frustrating when it isn't. We feel this pain too.
Next, in your command line navigate into the new site (cd cyberspace-place) and open the project directory in your code editor. We like VS Code but there are a ton of great editors and IDEs out there.
Signing Into the Control Panel#
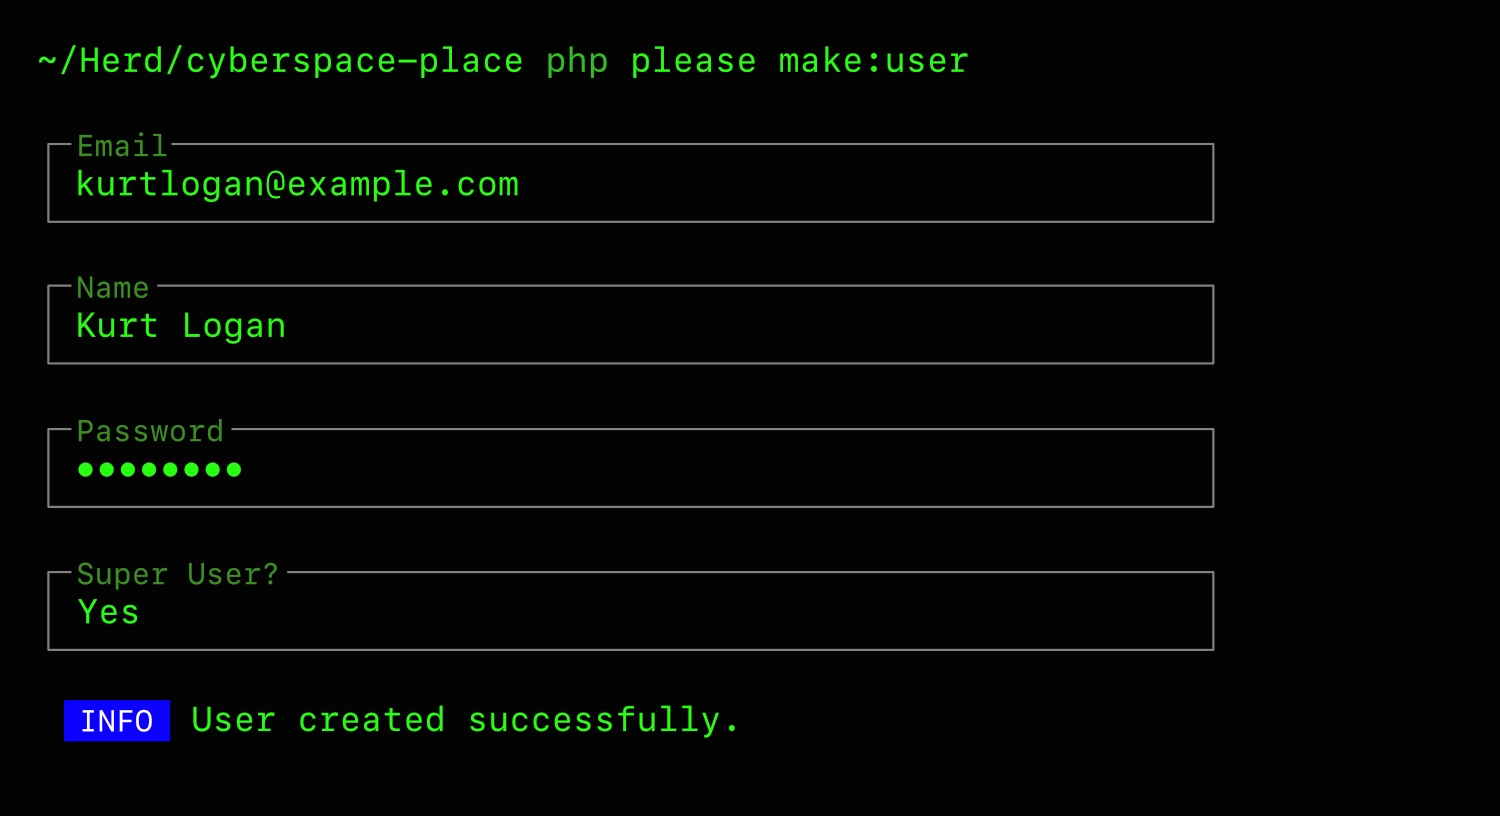
As part of the install process, you should have created a super user account, but if you said no by accident, we've got your back.
At any time you can run php please make:user from the command line and follow along with the prompts (name, email, etc). For the purpose of this walkthrough, be sure to say yes when asked if the user should be a super user otherwise you'll just have to do it again. And again. And again until you finally say yes. Never be afraid of committing to success.
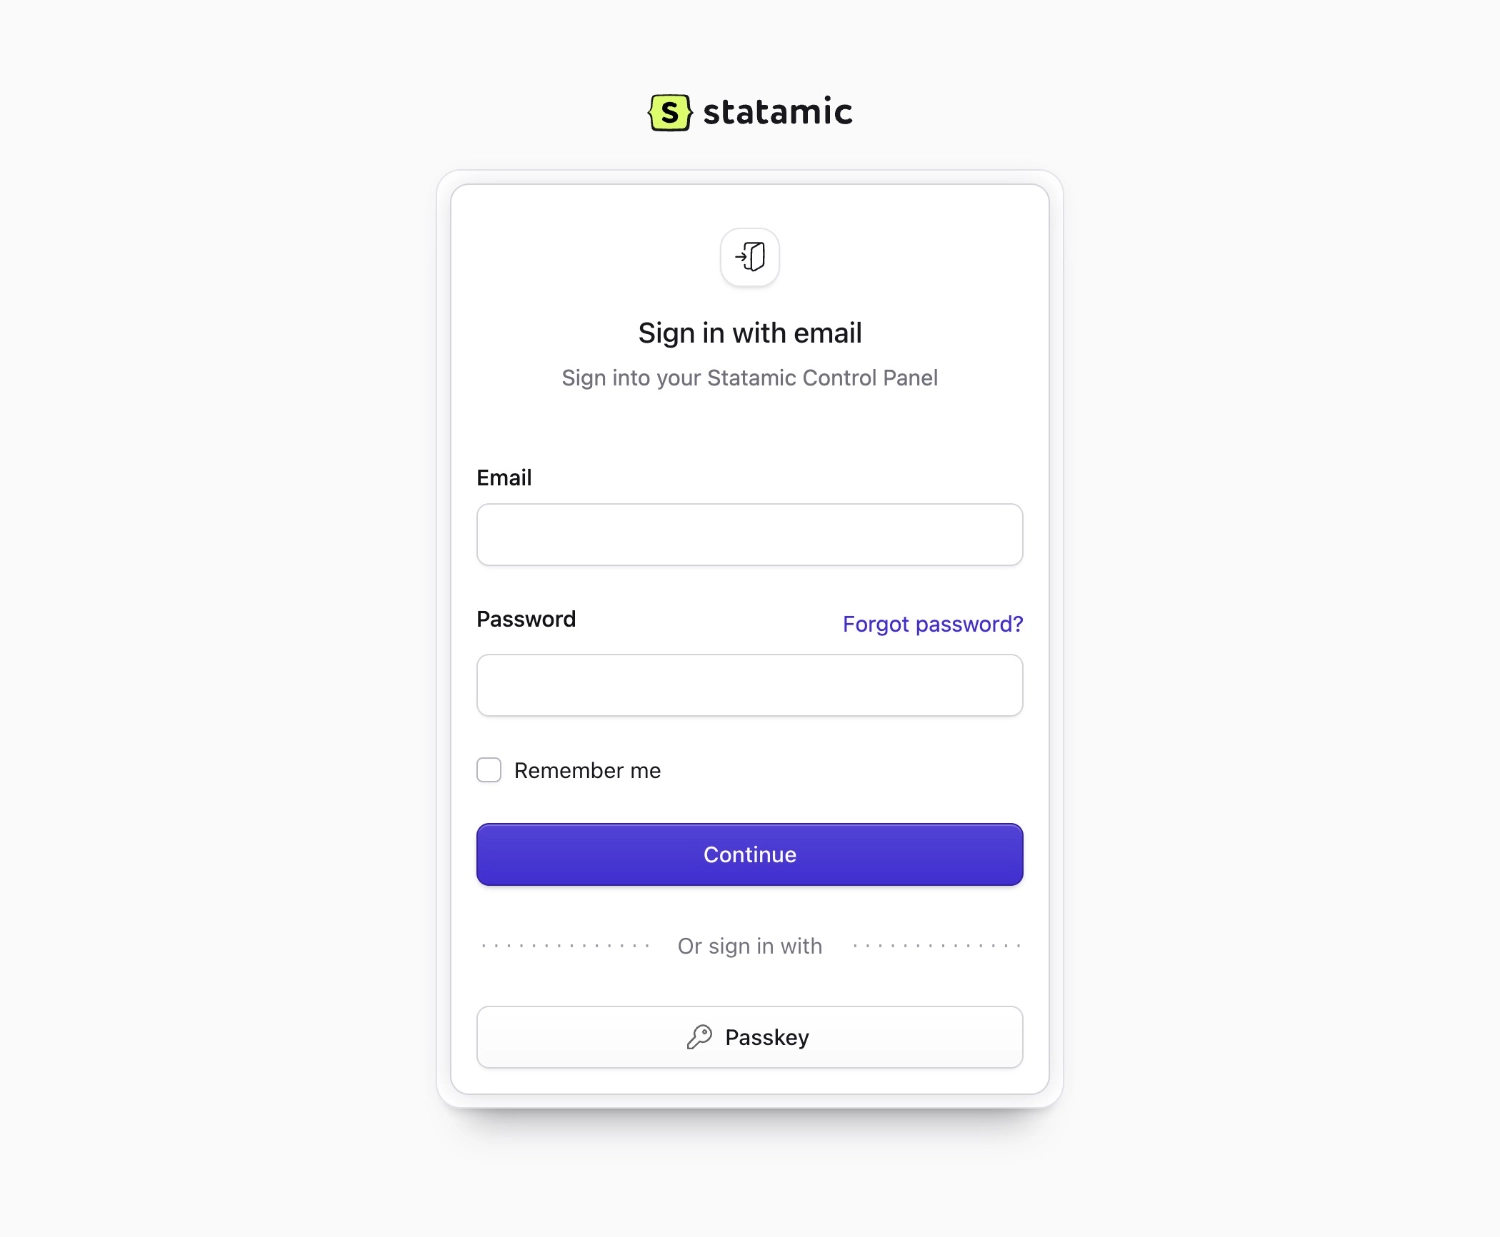
Now you can sign in. Head to http://cyberspace-place.test/cp and use your email address and password to sign into the control panel.
/cp you've just earned 200 XP!Make a home page#
Next, let's get some content of our choosing to show on the homepage. Head to Collections → Pages in the control panel, and you'll see an empty home page entry waiting for you. Click on the entry's title to edit it. Type anything you want in the content field and then click Save & Publish.
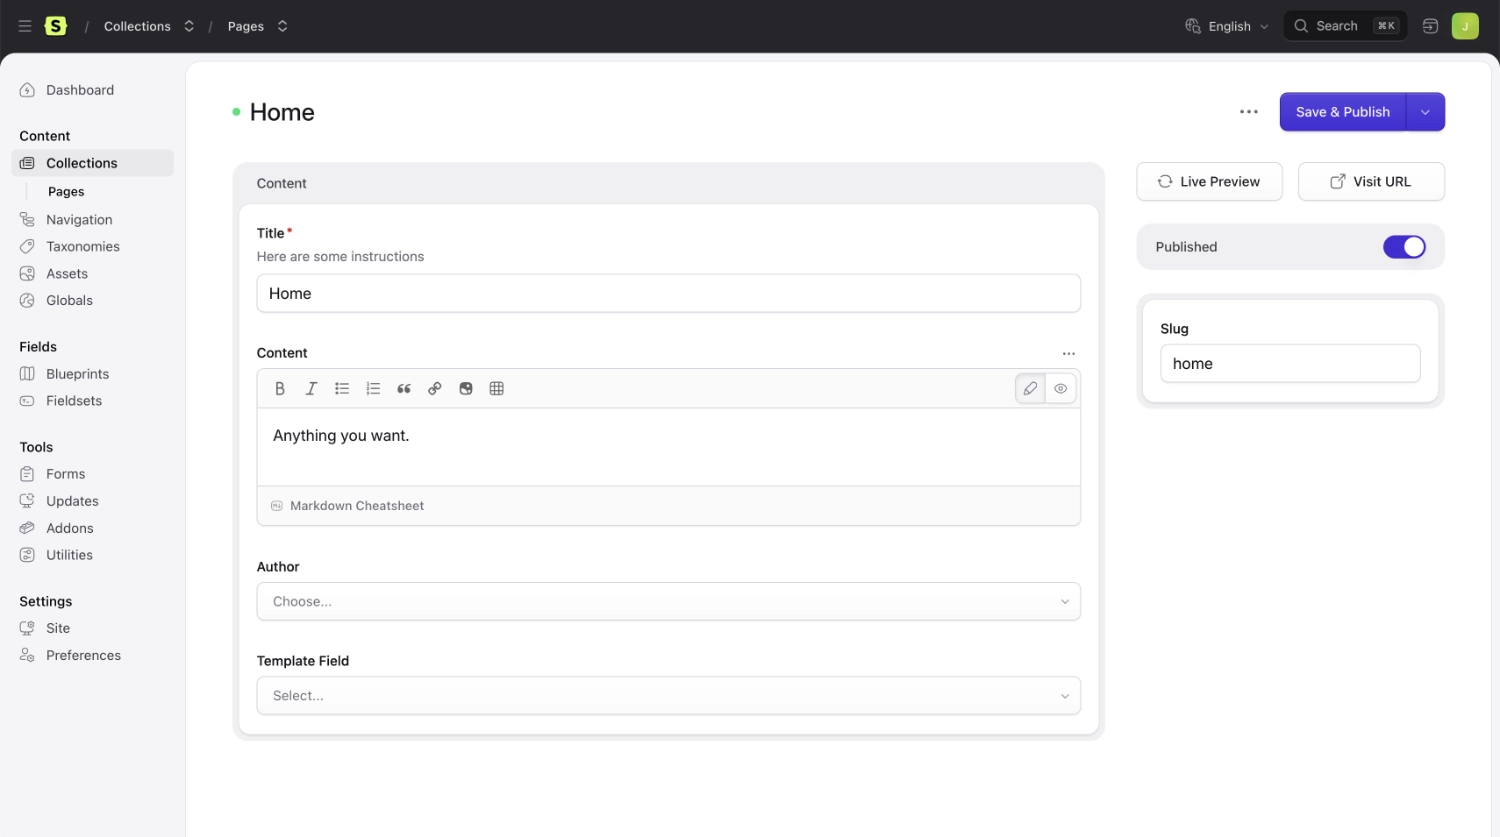

Note that the entry is using the home template (you can see it there in the template field). Let's edit it and reveal your new and incredible content to the browser.
In your code editor, open the file resources/views/home.antlers.html. This is the home template. The "name" of a template is the filename up until the file extension. Any view ending in .antlers.html will be parsed with Statamic's Antlers template parser.
If a view file ends with .blade.php it will use Laravel's Blade templates. This same pattern applies for any other template engine you may wish to install in the future, like Twig or something that hasn't been invented yet.

Delete all the placeholder HTML from the template and replace it with the following:
{{ content }}
Refresh the site in your browser and you should see your content in all of its glory. Each of those double curly tags is a variable. When on a URL that matches an entry's route rule, all of that entry's field data is available automatically in the defined template. We'll get into adding new fields in just a bit.
Customize the Layout#
You probably noticed that there is some very basic styling going on. That's coming from the layout. Time to customize that too. Open resources/views/layout.antlers.html and replace it with this:
<!doctype html>
<html>
<head>
    <title>{{ title }}</title>
    <meta charset="UTF-8">
    <meta name="viewport" content="width=device-width, initial-scale=1.0">
    <script src="https://cdn.tailwindcss.com"></script>
</head>
<body class="bg-gray-900 text-white text-lg font-mono">
    <div class="container max-w-lg mx-auto py-8">
        {{ template_content }}
    </div>
</body>
</html>
Your layout file contains any markup you want present no matter what page you’re on. It's usually the best place to put your <head> meta markup, persistent site navigation, site footer, and other global things.
Think of layouts like a picture frame, and everything that changes from section to section, page to page inside the frame — goes into templates. In practice, templates are injected inline wherever you put a {{ template_content }} variable in your layout to create a complete HTML document.

Now let's build a blog#
You might have known it was coming next – it's the staple of every CMS walkthrough. How easy is it to build a blog? You're about to find out.
But first, let's talk about what a blog is. A "blog" is a collection of posts that shares common traits or attributes. A typical blog post might contain a title, featured image, an author, a few tags, and the article content.
There is always a list (sometimes called an "archive") of blog posts linking to each post's unique URL, and sometimes the homepage has a short list of the most recent posts as well. Let's detail exactly what we're going to build, and then build it.
Here's our todo list:
- Create a blog "Collection" with the following fields:
title,featured_image,author, andcontent - Create a blog index page (
/blog) - Create a blog detail page (
/blog/why-i-love-mustard) - Add a list of the most recent 5 blog entries to the homepage
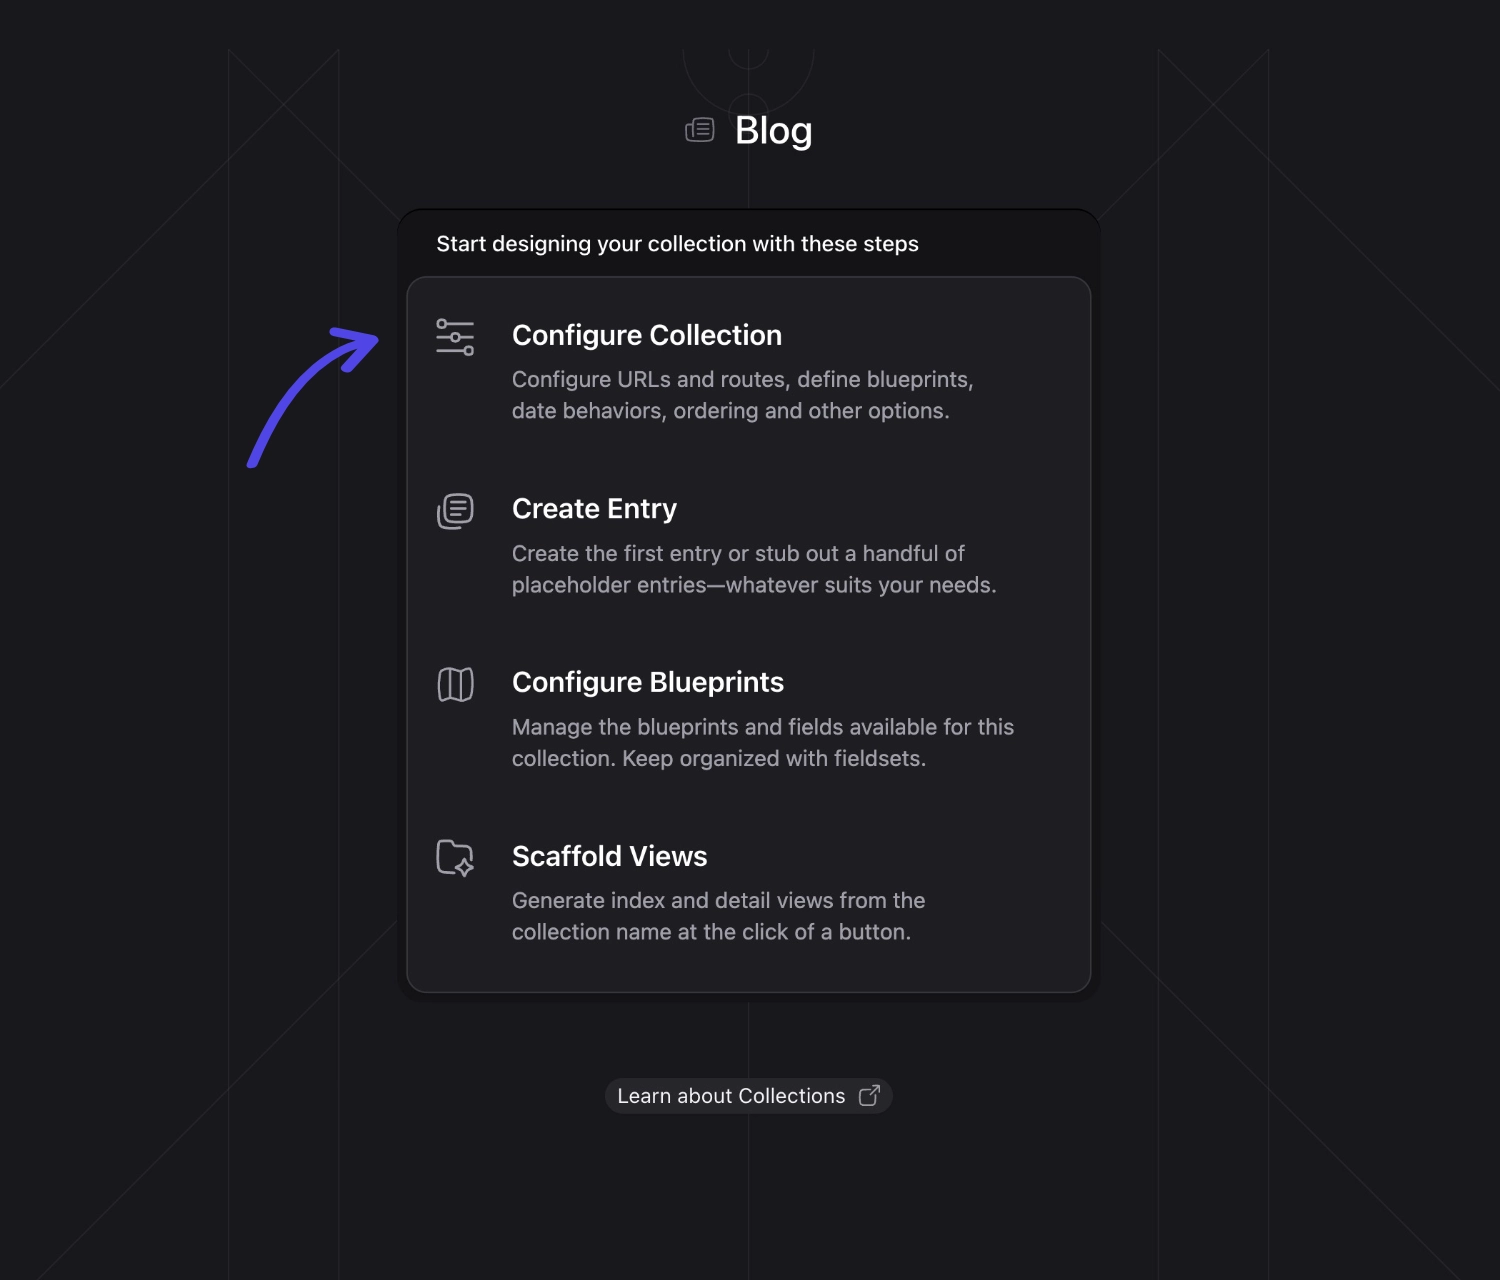
Create a new collection#
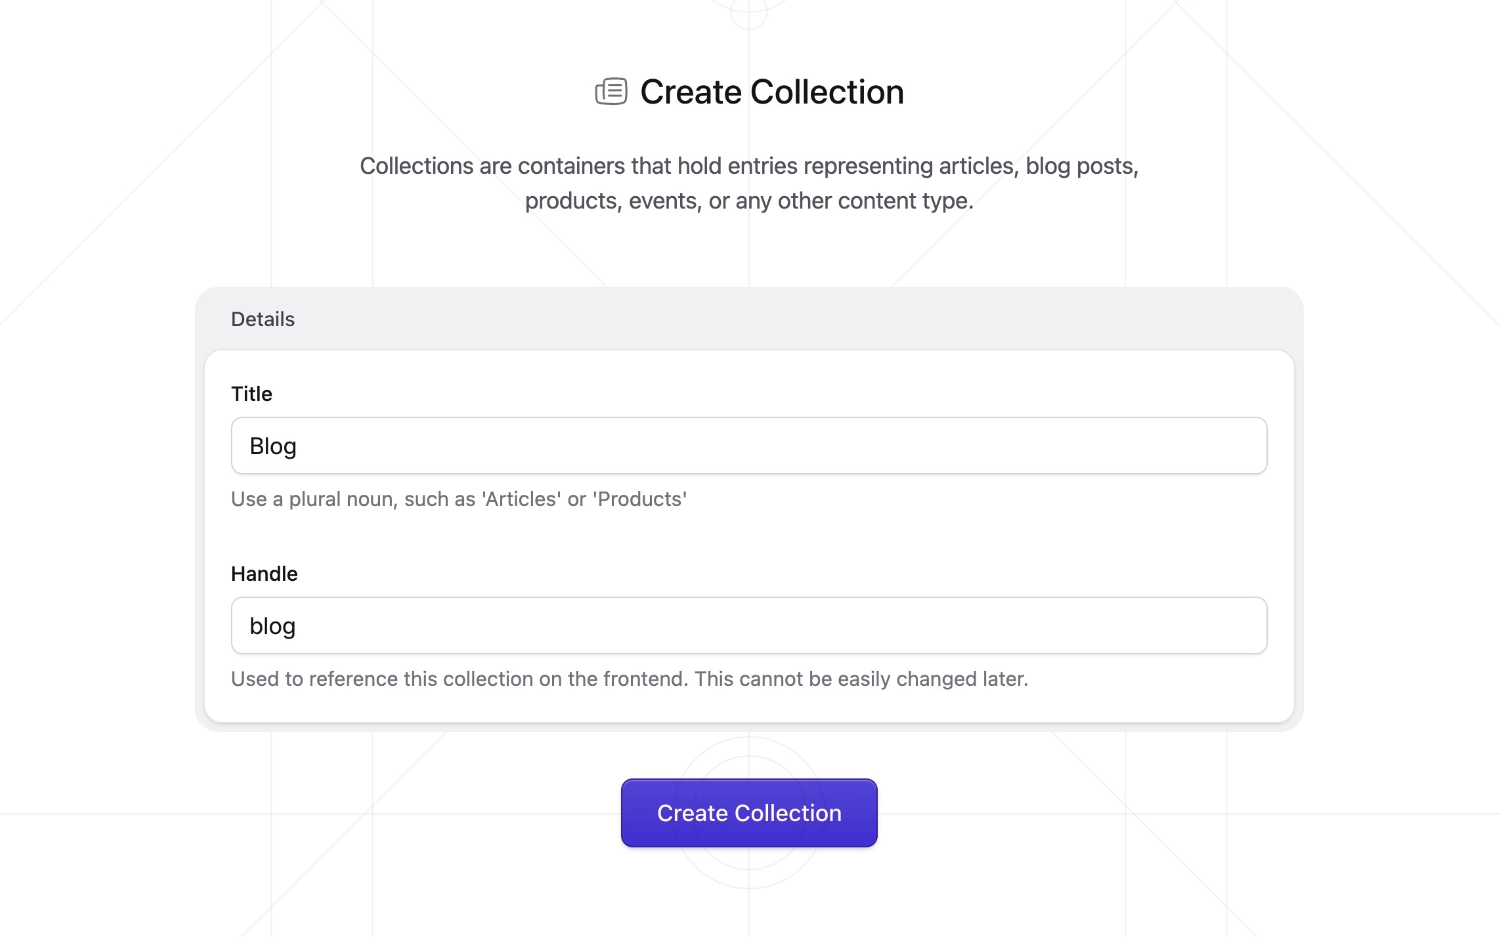
Head back to the Control Panel and click on the Collections link in the sidebar. Click the blue Create Collection button and then call your new collection "Blog".
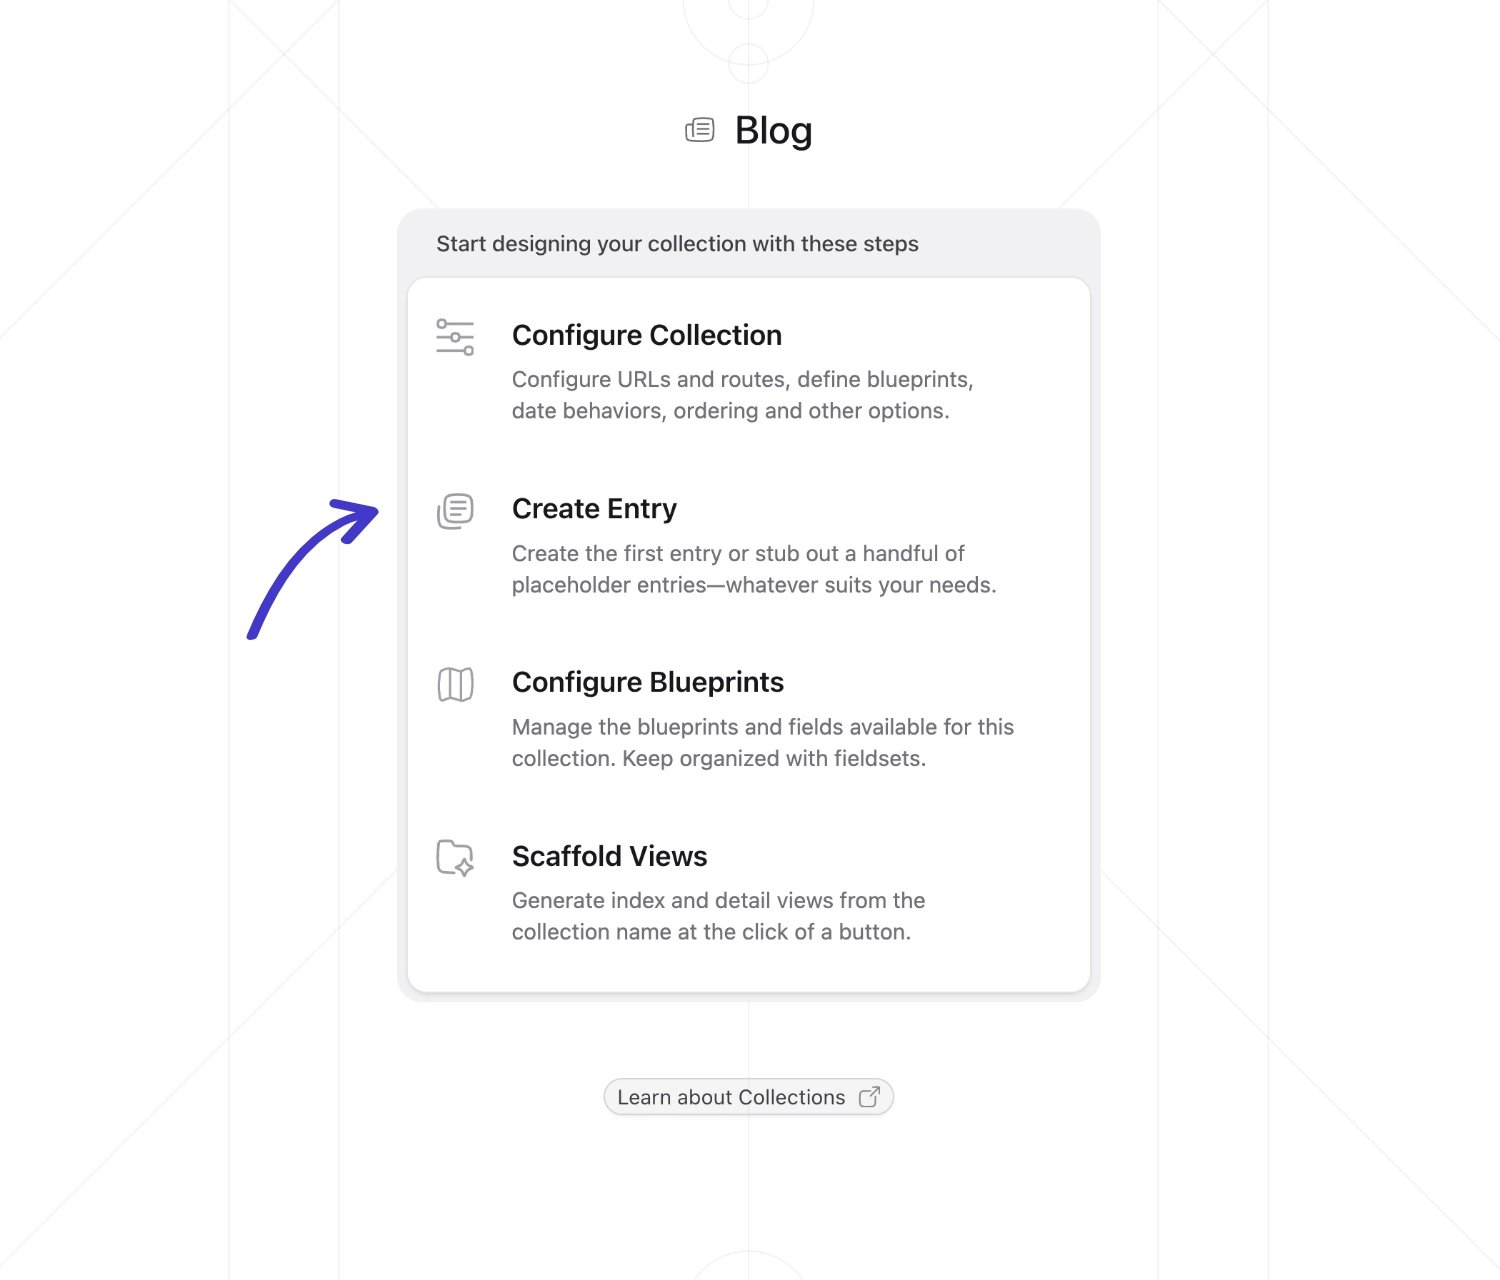
Scaffold your views#
Let's save you a minute or two and generate the index and show template. Click on Scaffold Views
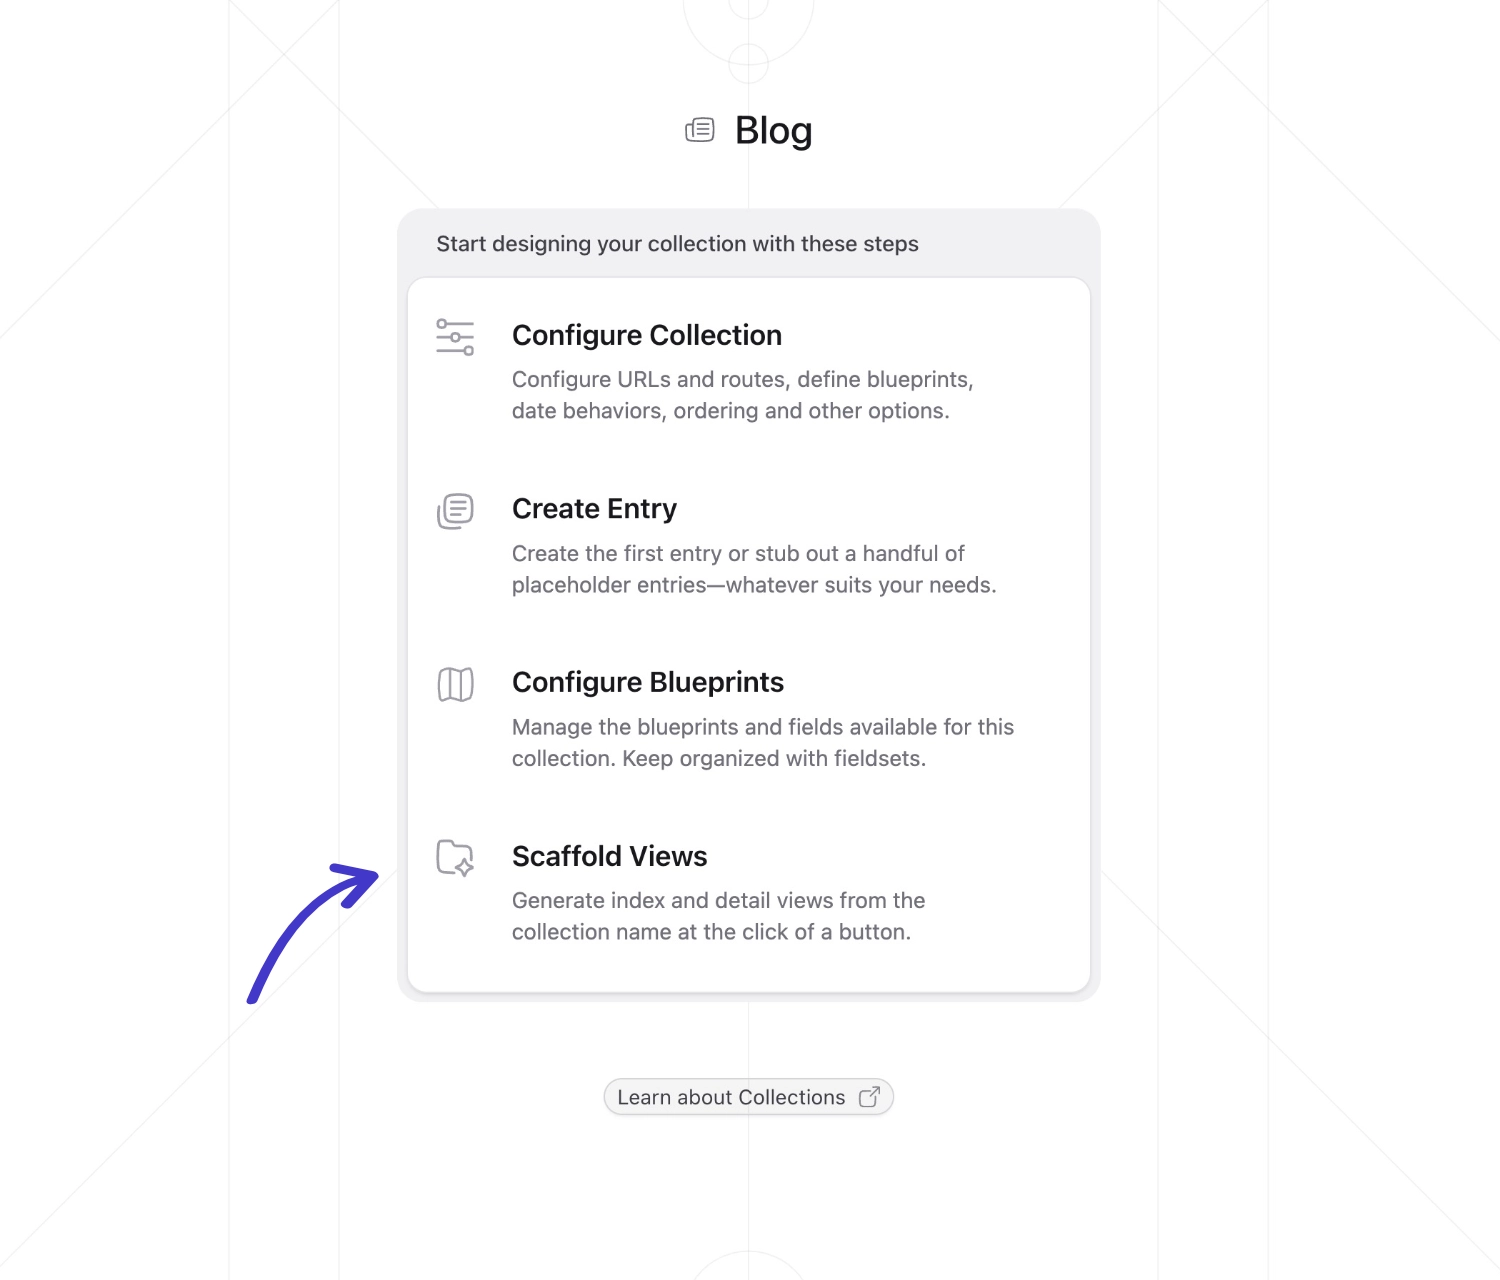
And then click the Create Views button. The defaults are perfect.
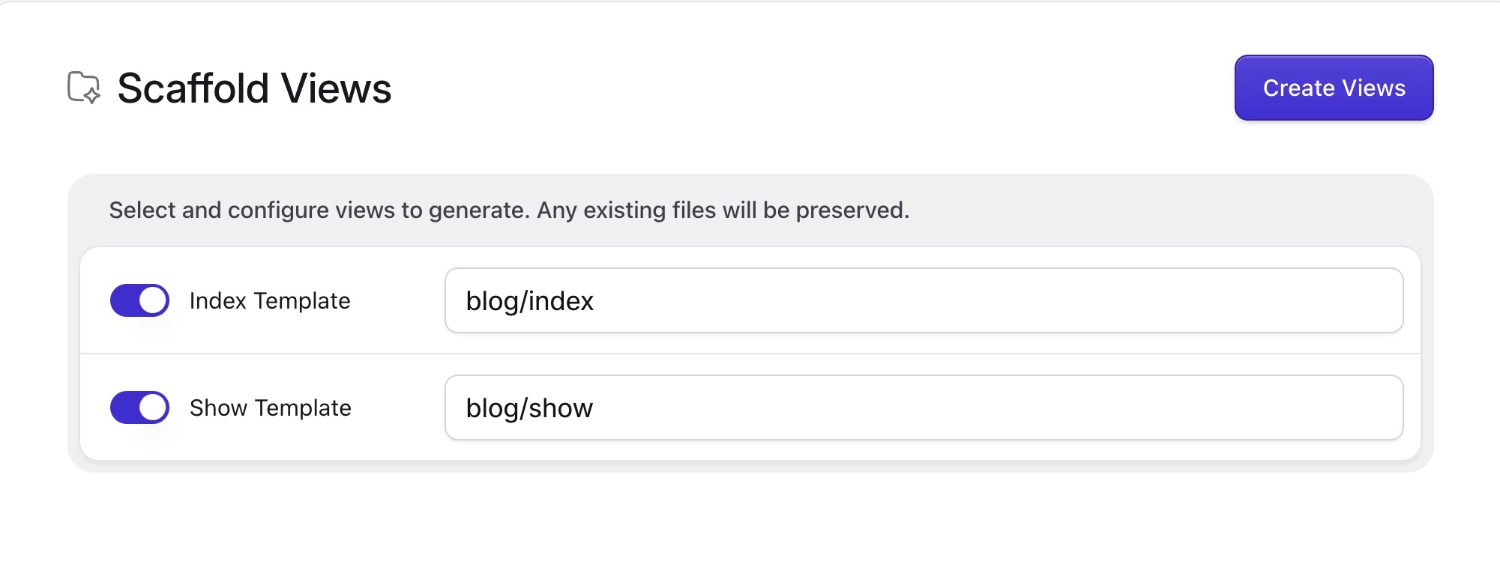
Two new files will be created. We'll be editing them soon:
resources/views/blog/index.antlers.htmlresources/views/blog/show.antlers.html
Configure the collection#
Next, let's configure the collection to behave the way a typical blog should. Click Configure Collection.

Statamic does its best to take a "start simple and add things as needed" approach to features and settings, in contrast to other platforms that take a "everything is included and rip out what you don't want" approach.
This means that Statamic doesn't do everything right out the box, but is much simpler to customize how you want everything to work.
We'll review some of the important settings, but we only need to touch two of them to make a blog:
- Enable Publish Dates (the subs-setting defaults are perfect)
- Set your route rule
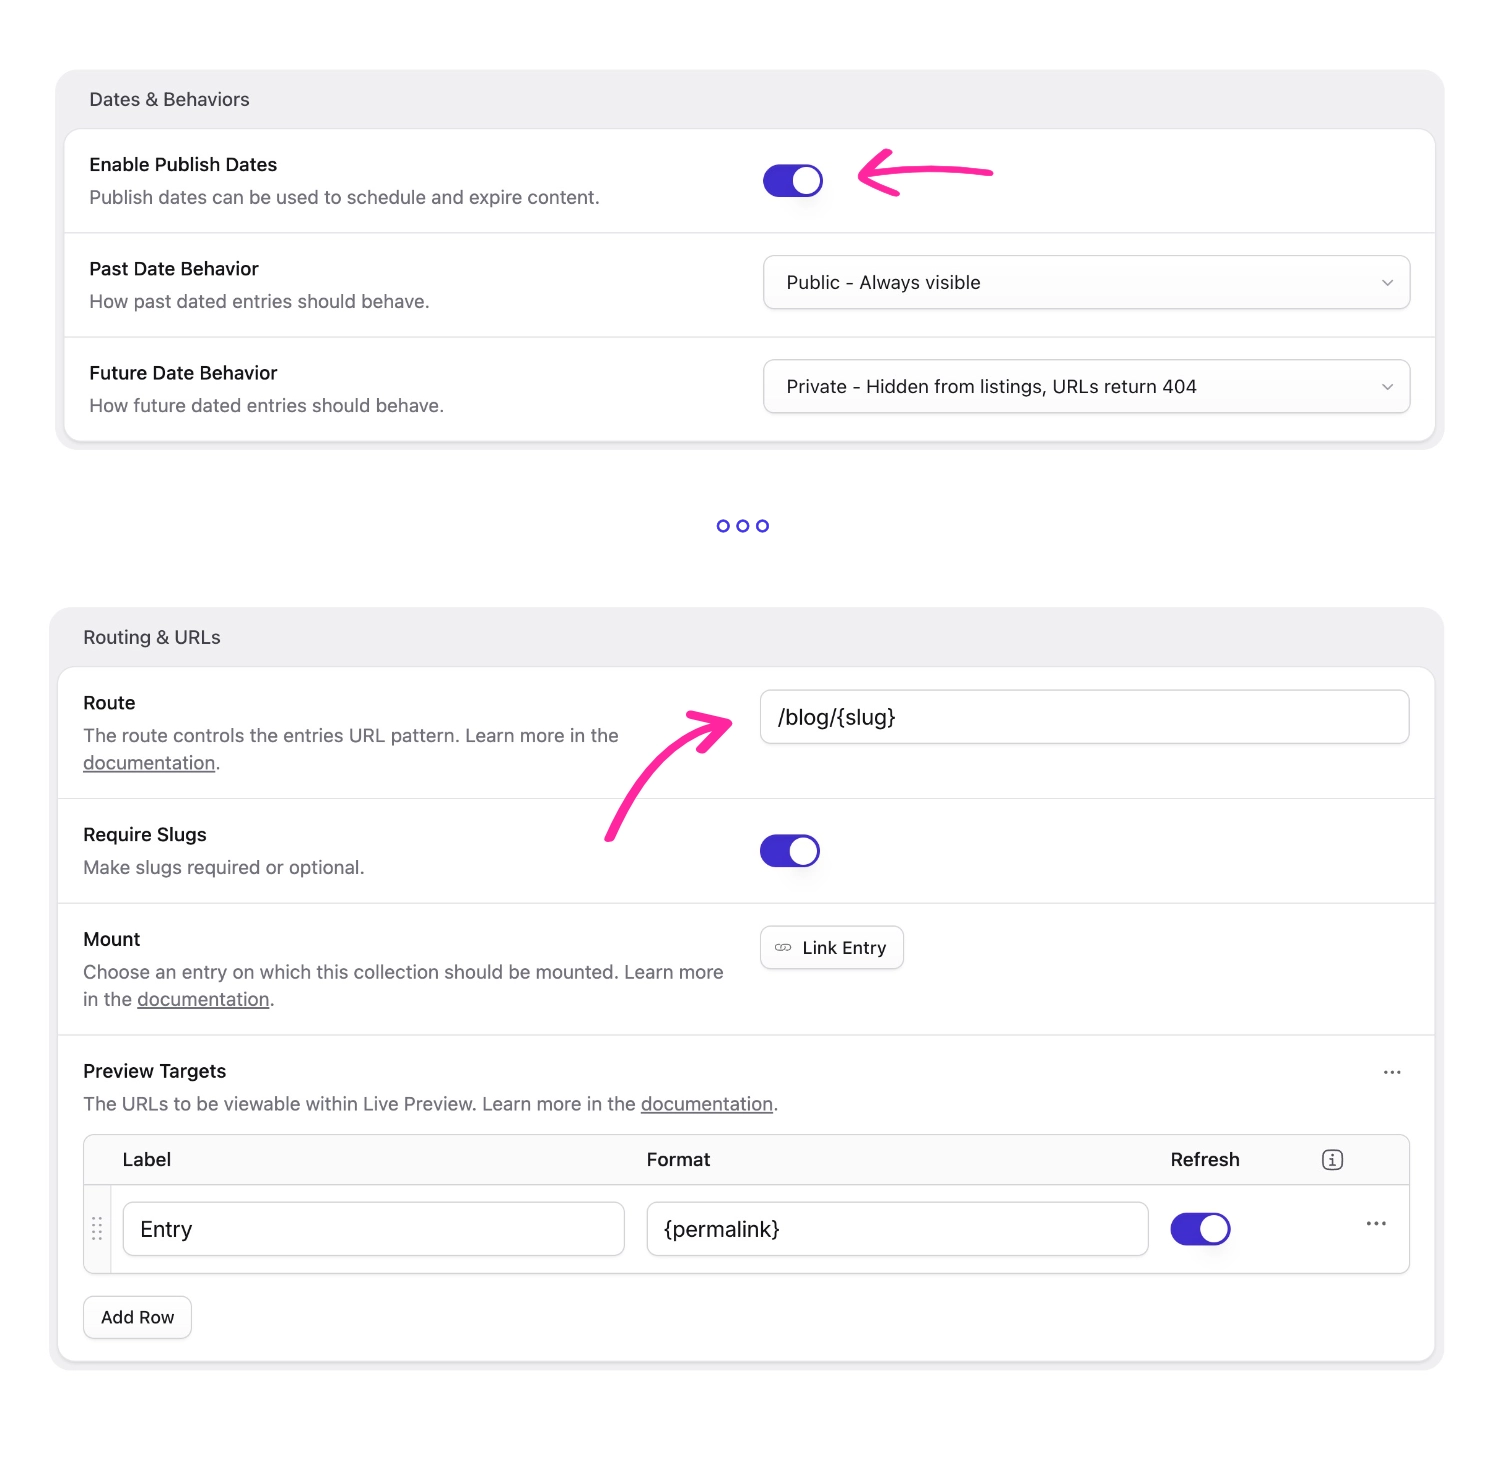

By enabling Publish Dates, Statamic will add a date field to your list of available entry fields (called a Blueprint), and will use the specified date to determine whether a given entry should be visible or not. Typical blog posts with a date in the future would be a scheduled post and not yet published, and one in the past is published, and therefore visible. This is how we'll configure our Blog Collection, and is the default behavior when you enable this feature.
As you scroll you'll notice a Content Model section. That template you scaffolded in the previous step is automatically selected as the default template for new Blog entries.
And finally in the Routing & URLs section you'll find the Route setting. Here you can create the URL pattern that all of your entries will follow. You can change this anytime and use any of the Collection's fields as variables in the pattern by surrounding them in single braces, {like_this}.
Here are some common patterns you could choose from:
| Example URL | Route Pattern Rule |
|---|---|
/blog/2021-12-24/merry-christmas |
/blog/{year}-{month}-{day}/{slug} |
/blog/2020/still-bored |
/blog/{year}/{slug} |
/blog/happy-new-year |
/blog/{slug} |
/evergreen-syle |
/{slug} |
Check out the full list of available variables. Try saying "available variables" 3x fast. It's not the best tongue-twister, but it does qualify.
When in doubt, keep it simple. And then save your changes.
Creating your first entry#
We like to make things work and then make them better. With that in mind, let's make our first blog post and get it to show on the frontend before we configure all the custom fields and whatnot.
Head back to your blog Collection screen and click Create Entry.

Now you can see all the default fields for your new Collection. They're the same as the Home entry you edited a few moments ago. Go ahead and make a new blog post. Make two if you'd like! It's up to you.
| Field | Notes |
|---|---|
| Title | The required title of the entry |
| Content | A simple Markdown field |
| Author | Defaults to whoever is logged in |
| Template | When not explicitly set will use the Collection's default |
| Slug | Automatically generated off the title until you edit it manually |
| Date | Defaults to today |
Time for more frontend#
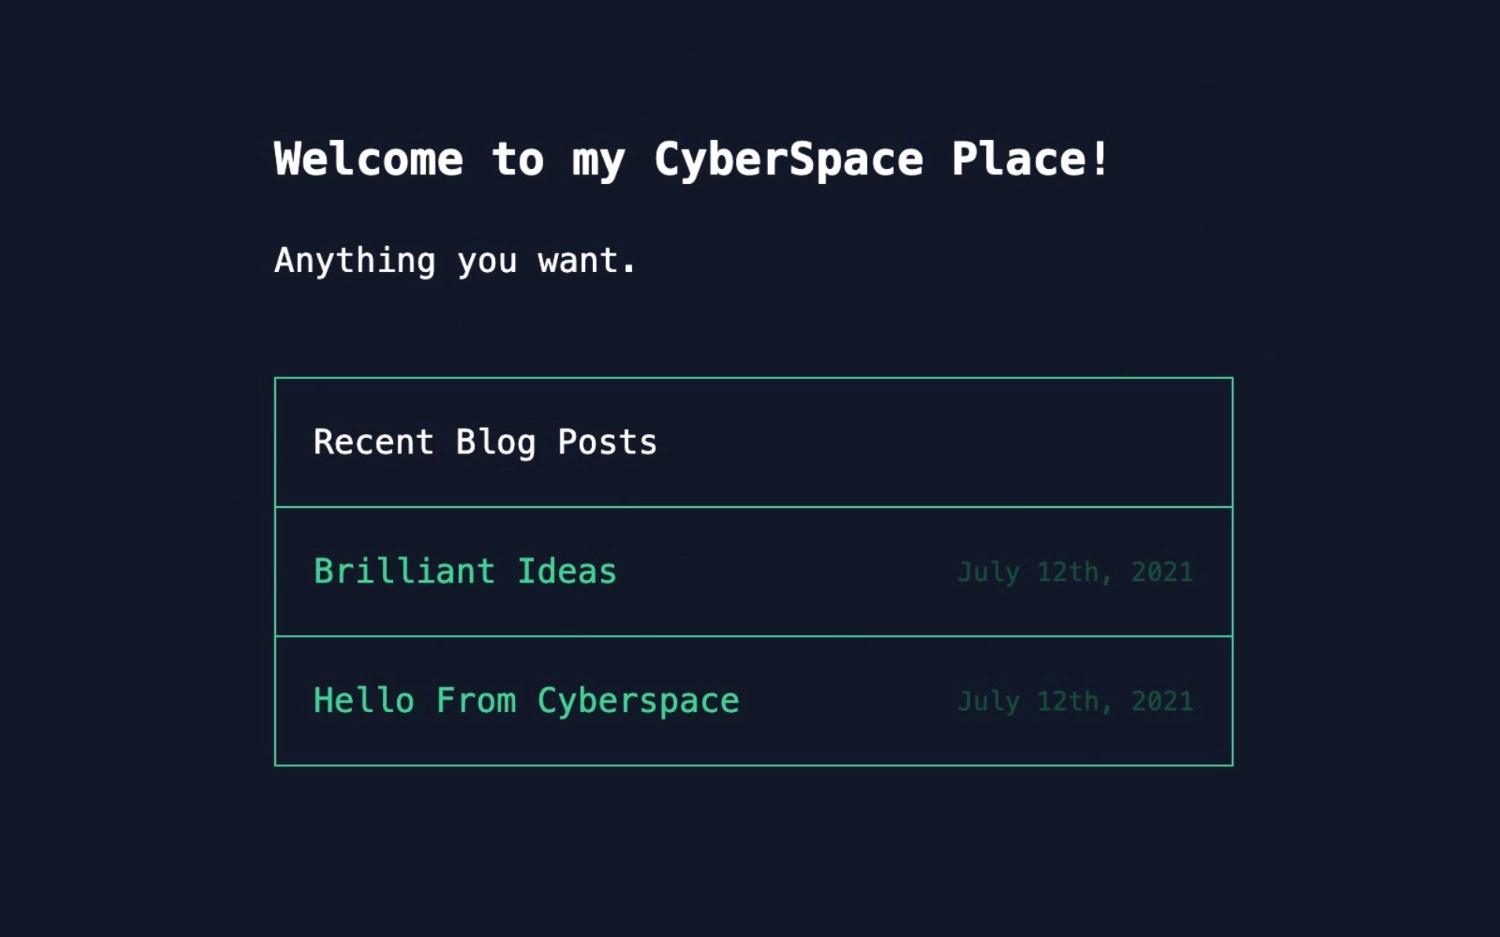
It's code editor time! Let's get that list of the 5 most recent entries onto the homepage since it already exists and is one of our todos. Open resources/views/home.antlers.html and replace that lonely {{ content }} with this markup (don't worry, we'll explain what's going on in a moment):
// resources/views/home.antlers.html

<h1 class="text-2xl font-bold my-6">Welcome to my CyberSpace Place!</h1>
{{ content }}

<section class="border border-green-400 mt-12">
    <h2 class="p-5">Recent Blog Posts</h2>
    {{ collection:blog limit="5" }}
        <a href="{{ url }}" class="flex items-center justify-between p-5 border-t border-green-400 text-green-400 hover:text-green-900 hover:bg-green-400">
            <span>{{ title }}</span>
            <span class="text-green-900 text-sm">{{ date }}</span>
        </a>
    {{ /collection:blog }}
</section>
If you refresh your homepage (and managed to name your placeholder entry or two the same as us), you should see this:
Let's take a closer look at how this works. Stripping out all the styling in the example, here's the most basic Antlers template snippet that fetches your entries.
{{ collection:blog limit="5" }}
    <a href="{{ url }}">{{ title }}</a>
{{ /collection:blog }}
Here you can see we're telling the Collection Tag tag to use the blog collection and limit the number of returned entries to 5. Inside the tag pair is a loop that iterates over each entry with access to all the data available as {{ variables }}.
The url will follow the pattern you set in the route rule (/blog/hello-from-cyberspace perhaps?) and if you were to click it, you'd see a new page using the resources/views/blog/show.antlers.html template, which is empty so there's not much to look at. Let's edit that next.
The blog "show" template#
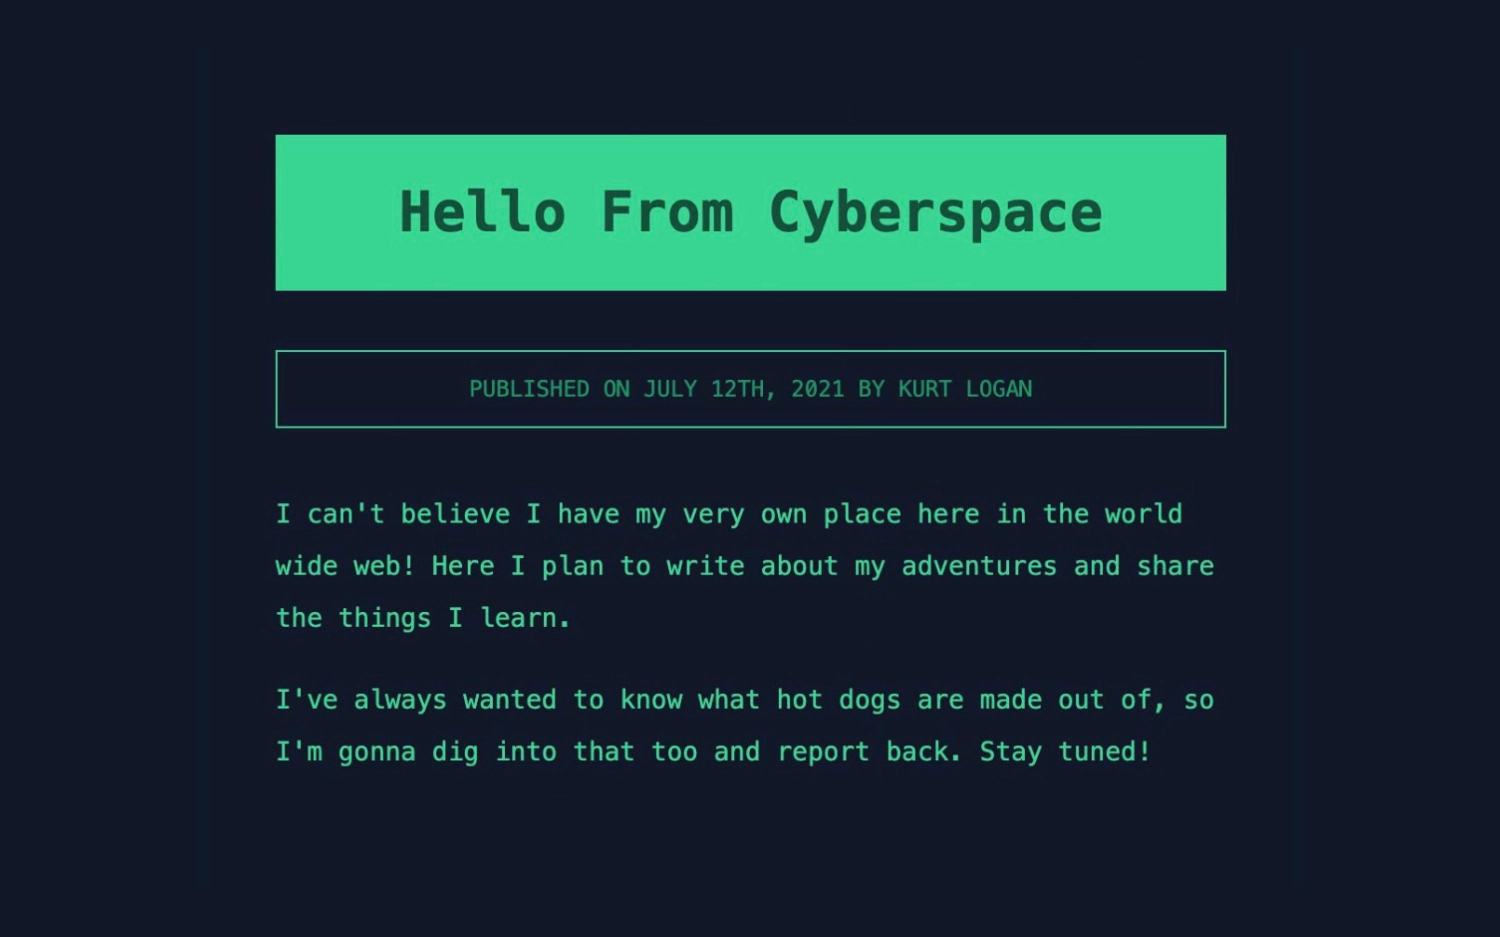
Now that we're on an entry's very own unique URL, you no longer need that {{ collection:blog }} tag pair to fetch data. All of the entry's data is available automatically. Here's a really simple snippet you can drop in so you can see the data pull through.
// resources/views/blog/show.antlers.html

<h1 class="text-3xl bg-green-400 text-center text-green-900 font-bold mt-6 p-6">{{ title }}</h1>
<div class="border text-center text-green-600 border-green-400 mt-8 p-3 text-xs uppercase">
    Published on {{ date }} by {{ author:name }}
</div>

<article class="space-y-4 mt-8 text-sm text-green-400 leading-loose">
    {{ content }}
</article>
A few cool things to note here in this code example:
- The author's
nameis being accessed by reaching into the{{ author }}object. You can retrieve any data (but not password) on a user this way. Pretty cool. - The
contentfield is being automatically converted from Markdown to HTML because we're using a Markdown field. If you were to use a generic Textarea field, you'd need to transform the Markdown yourself by using a modifier. It would look like this:{{ textarea | markdown }}.
Blog index#
Next, let's make that blog index page. Head back to the control panel and go to the Pages collection. Create a new entry and call it "Blog", "My Blog", or even "My CyberBlog" — just make sure the slug is blog. Set the template to blog/index.
Back to your code editor — open up the resources/views/blog/index.antlers.html template and drop in this snippet. It's essentially what we built on the home page, but without the limit.
// resources/views/blog/index.antlers.html

<h1 class="text-2xl font-bold my-6">{{ title }}</h1>
{{ content }}

<section class="border border-green-400 mt-12">
{{ collection:blog }}
    <a href="{{ url }}" class="flex items-center justify-between p-5 border-t border-green-400 text-green-400 hover:text-green-900 hover:bg-green-400">
        <span>{{ title }}</span>
        <span class="text-green-900 text-sm">{{ date }}</span>
    </a>
{{ /collection:blog }}
</section>
And stop right there. We've now duplicated a whole chunk of code for one tiny little bit — limit="5'. Let's DRY this up (reduce code duplication).
It's totally fine to duplicate code sometimes, especially if you have to make some code significantly more complex to reuse it. Just keep that in mind. We'll keep this simple.
Your first partial#
Partials are reusable template chunks. Create a new file named _listing.antlers.html in the resources/views/blog/ directory. Prefixing a template with an underscore is a common convention to indicate that it's a reusable partial and not a full layout. You could also create a subdirectory named partials — it's up to you. Just be consistent.
Inside that new template file, copy and paste the entire <section> chunk that includes the Collection tag pair from either the homepage, the blog index, or this guide. We can create a variable on the fly here so you can pass a desired limit into your partial. Replace that second line with this:
{{ collection:blog :limit="limit" }}
Prefixing the limit parameter with a colon tells Statamic to look for a variable named "limit" as the argument. If there isn't one it will be null, which will not set a limit which is how we want it on the blog index template.
Your blog index template can now look like as simple as this:
// resources/views/blog/index.antlers.html

<h1 class="text-2xl font-bold my-6">{{ title }}</h1>
{{ content }}
{{ partial:blog/listing }}
Now let's dry up the home template. We know we need to pass that limit in, but if you recall (or visit the homepage), we had that extra <h2> above the collection:blog tag. This is a perfect opportunity to add a "slot".
Switch to your new blog/listing partial and add {{ slot }} to the line right above the collection tag, like so:
// resources/views/blog/_listing.antlers.html

<section class="border border-green-400 mt-12">
    {{ slot }}
    {{ collection:blog :limit="limit" }}
...
Back in your home template, you can now replace that chunk of markup with a call to the partial, setting the limit, and using it as a tag pair to send the contents in as the slot. A super helpful little pattern.
Here's your entire home template:
// resources/views/home.antlers.html

<h1 class="text-2xl font-bold my-6">Welcome to my CyberSpace Place!</h1>
{{ content }}
{{ partial:blog/listing limit="5" }}
    <h2 class="p-5">Recent Blog Posts</h2>
{{ /partial:blog/listing }}
The nav#
We're almost done, but before we head back to the control panel to add a few more fields to your blog blueprint, let's add a nav.
Your home and blog entries are both in an "ordered" Pages collection. If you look at this default collection's config you'll see that it has the Orderable setting on and that the root page is considered the home page. This lets you have a page with a slug of /.
We can use the Nav tag to fetch the entries in the Pages collection in the order you have them arranged.
Open up your layout file and drop in this nav snippet, right after the open body tag.
// resources/views/layout.antlers.html
// ...

<nav class="bg-black text-xs uppercase text-green-500 text-center flex items-center justify-center space-x-4">
    {{ nav:collection:pages include_home="true" }}
        <a href="{{ url }}" class="p-2 block hover:text-yellow-200">{{ title }}</a>
    {{ /nav:collection:pages  }}
</nav>
The nav tag works very much like the collections tag. It loops through the entries and gives you access to all the data inside each.
Customizing your blueprint#
We've got a pretty functional site going here, but so far we've only worked with default fields. Few sites can be so simple, so let's spice it up a bit.
Head to the Blueprints area in the sidebar and click Blog. Now you're looking at all the fields you've been working with, organized into Tab Sections.
Tab Sections let you group fields into Tabs which can help you stay organized, keep similar fields together, or help push optional, unusual fields out of mind for most authors. It's up to you how you'd like to organize these.
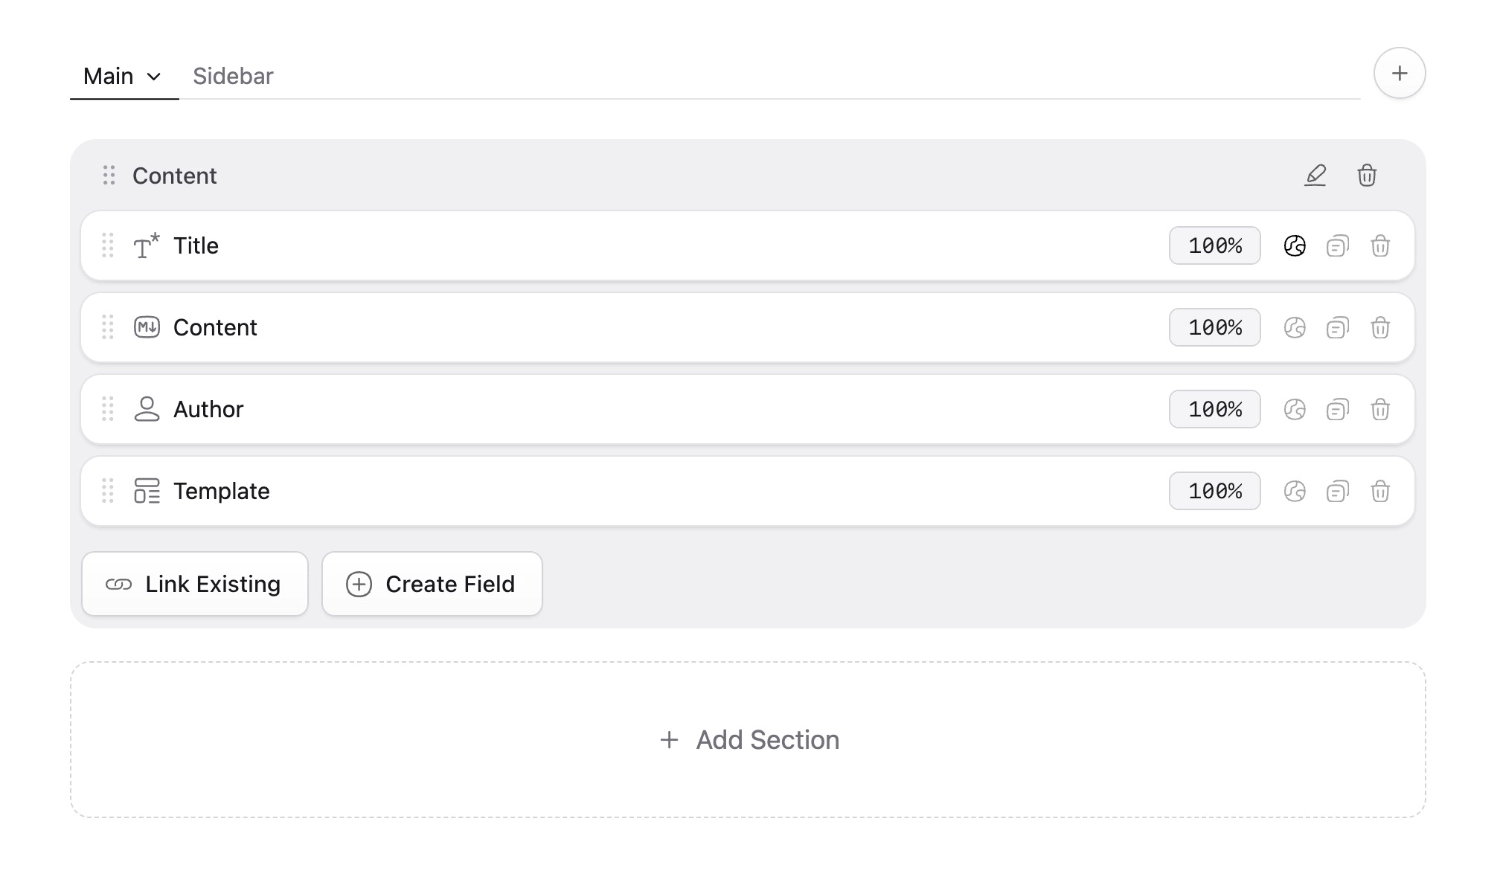
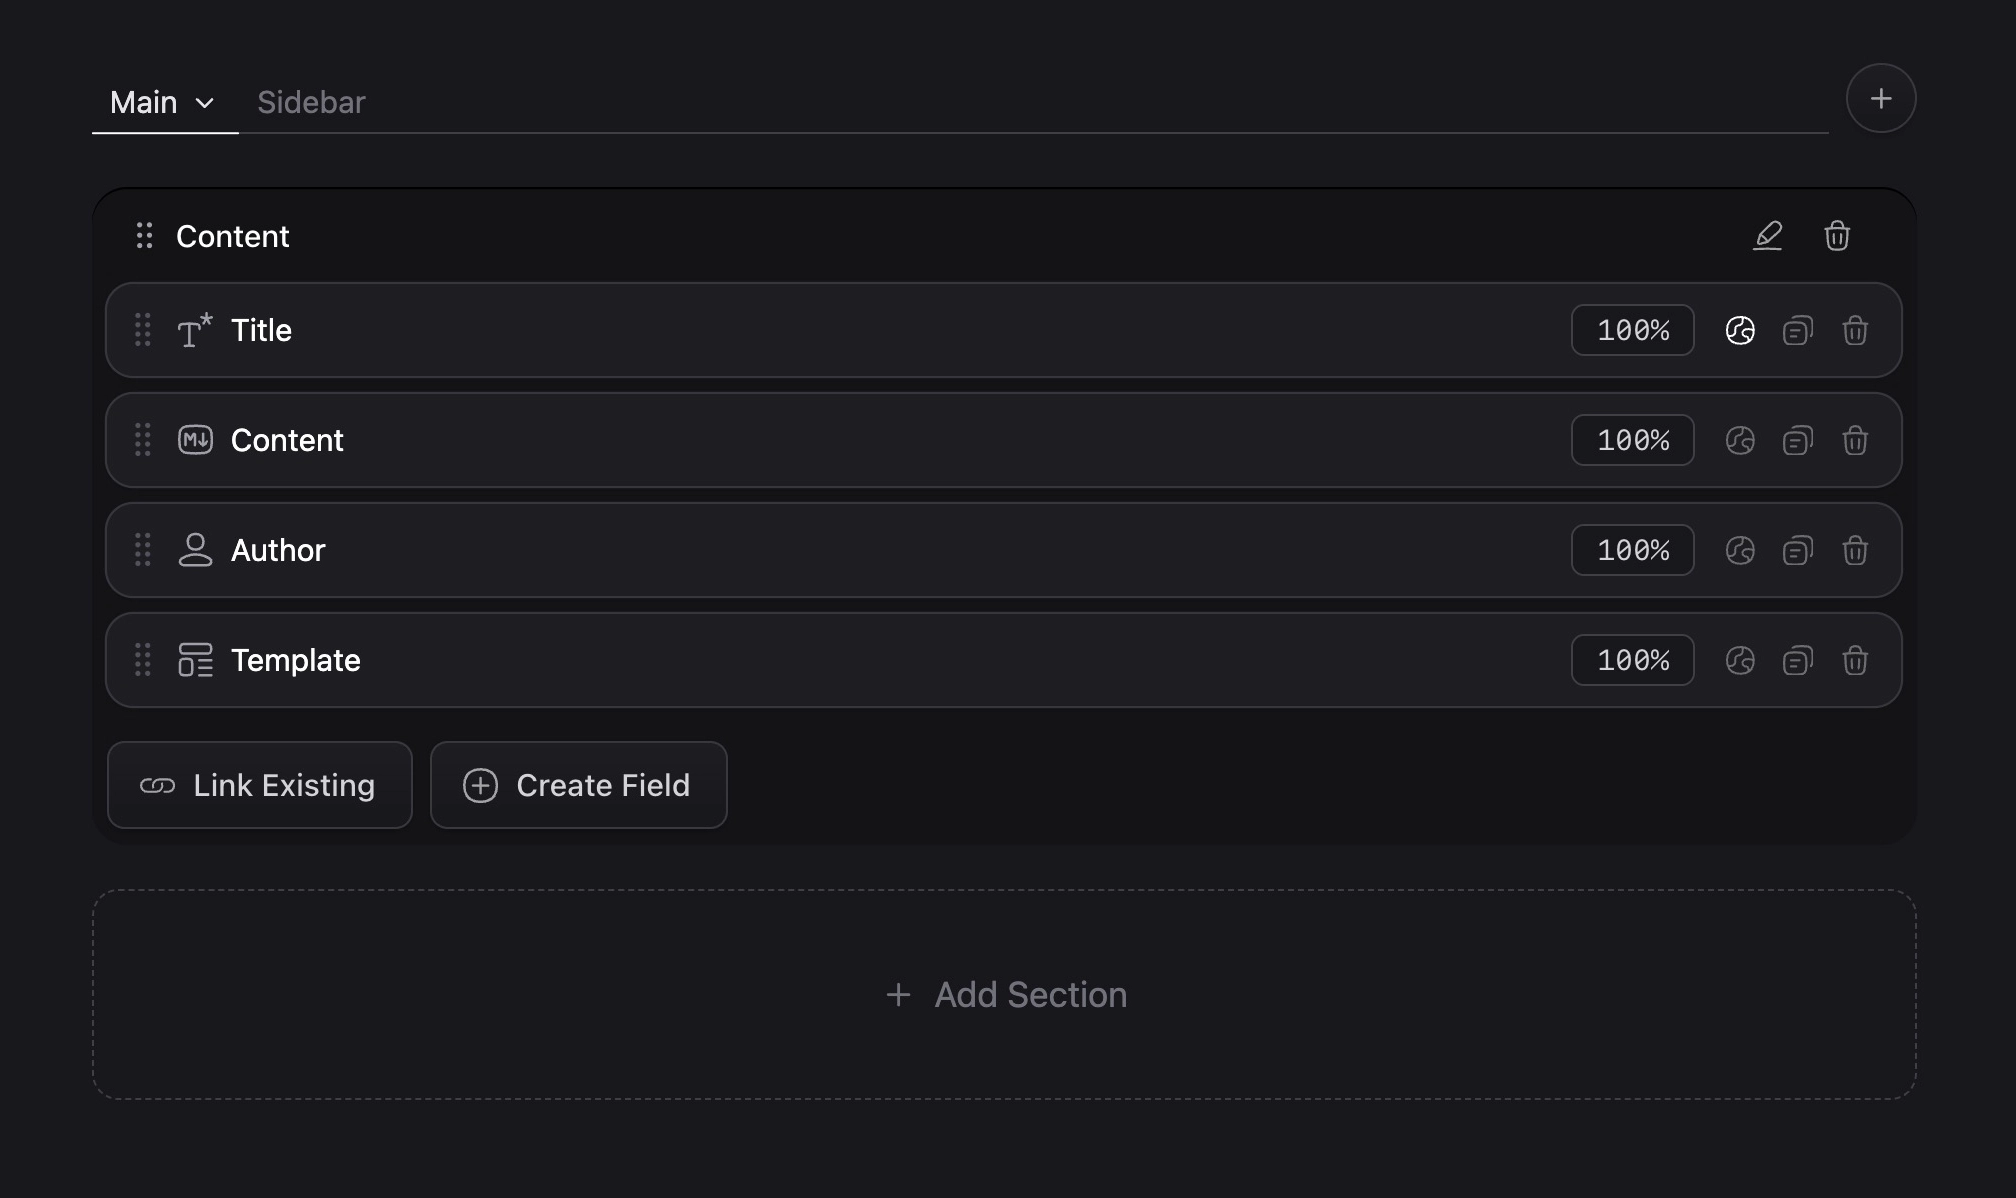
You can drag, drop, and rearrange fields inside and across your sections. This order will be how you see the fields in the publish screen.
The Sidebar is a special section. It controls the fields shown in the publish sidebar when your browser is wide enough, and collapses those fields to a tab when it isn't. If you delete the Sidebar section, you won't have one — and if you create a new one called "Sidebar", it'll work just as before.
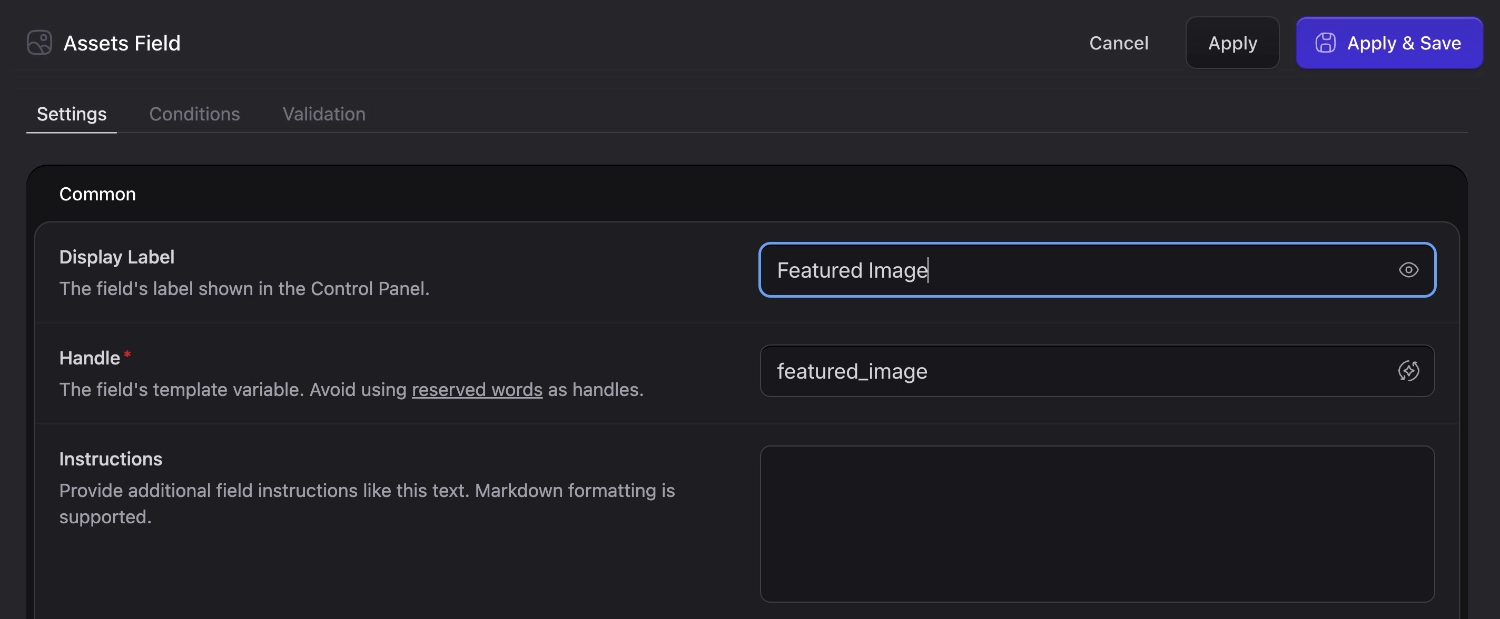
Let's create a new field called featured_image.
Click Create Field in the Main section and behold! A big list of fieldtypes! You can learn more about each Fieldtype elsewhere in the docs, but here are a few quick tips on narrowing down what you're looking for.
When this screen is opened, you're automatically focused in the search box, so you can start typing the fieldtype name if you know it (Hint: you could type assets now). Or, you can narrow the fields down by type – All, Text, Media, and Relationship. You'd find the Assets fieldtype inside Media.
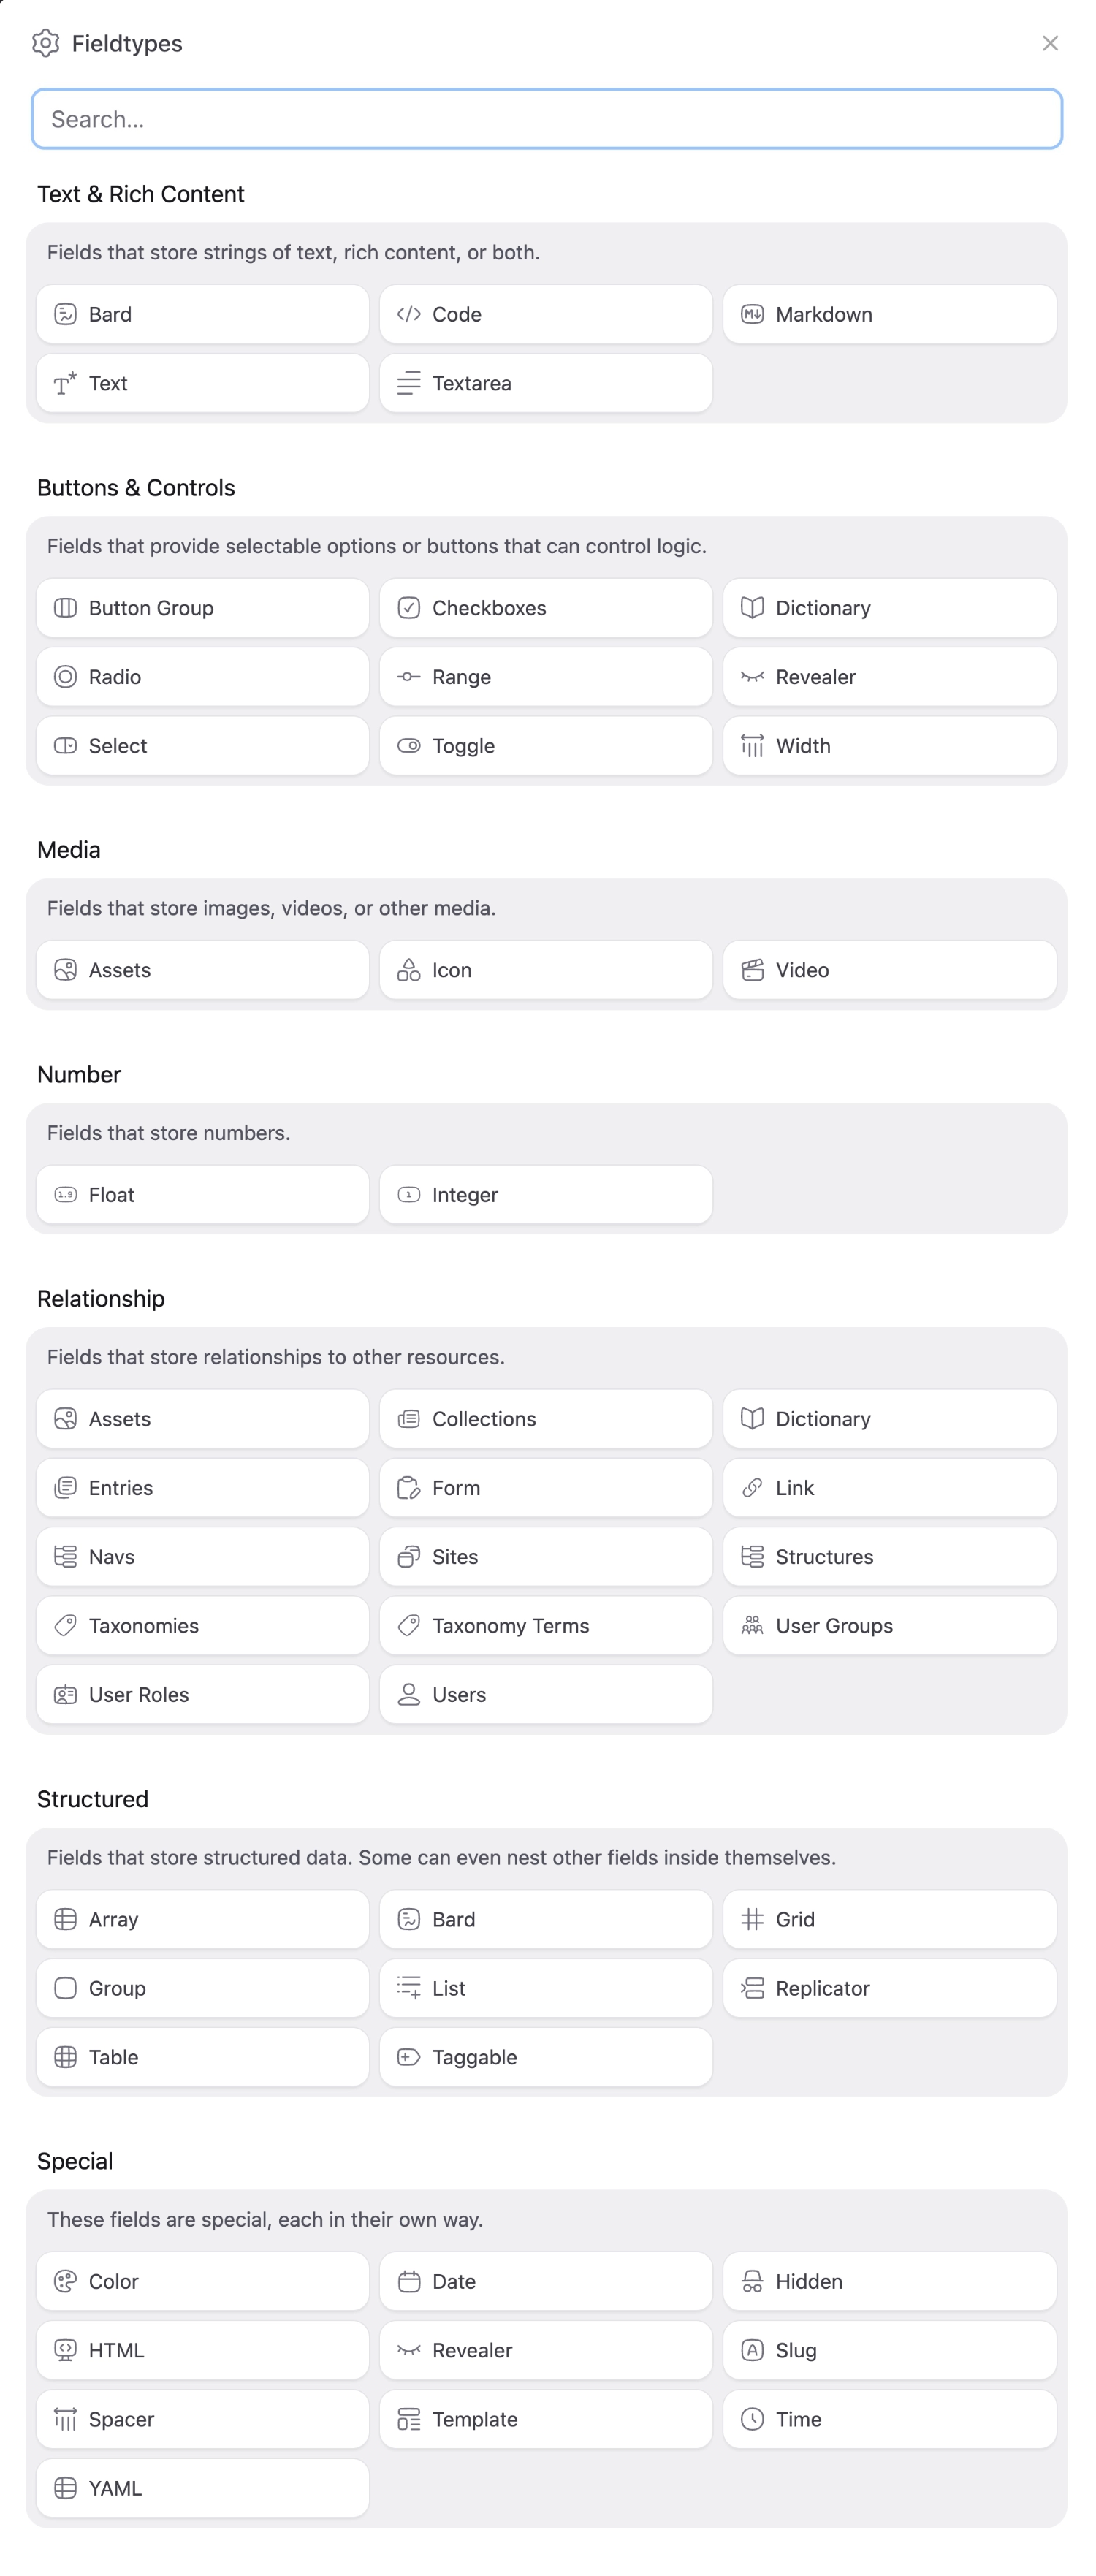
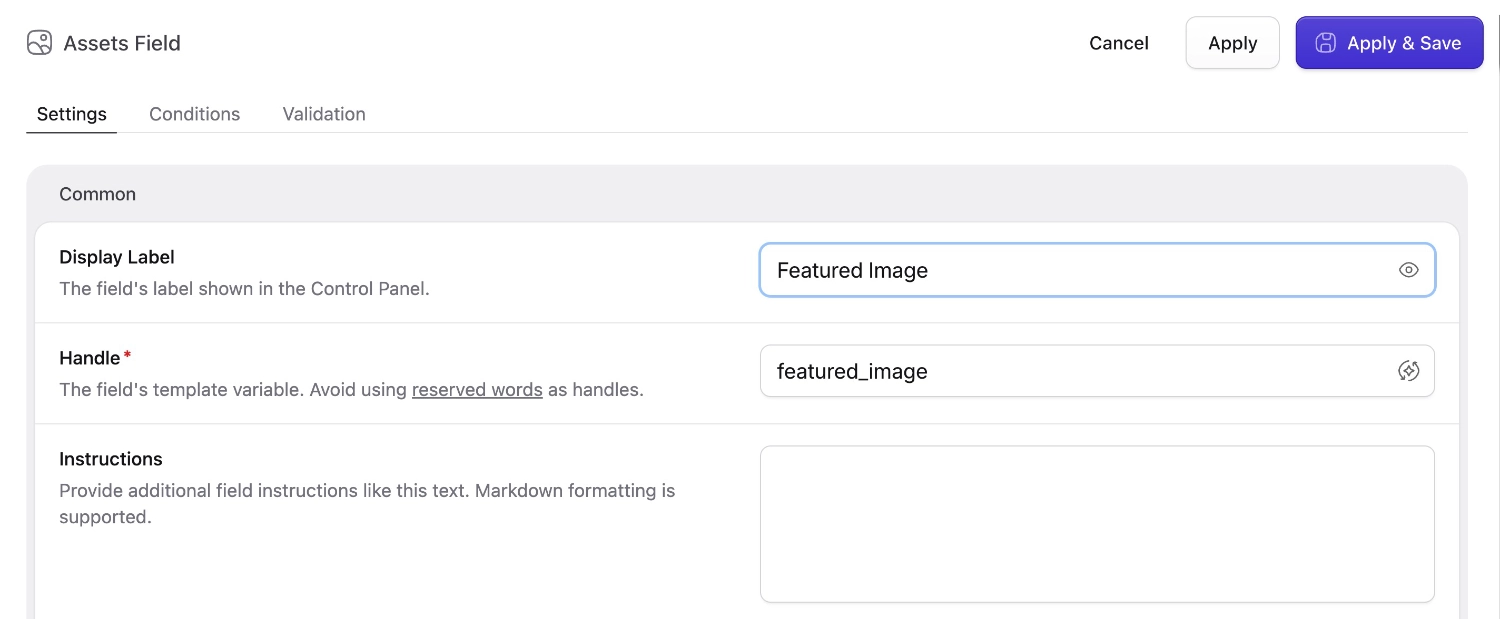
Find the Assets fieldtype and click it. Assets fields let you pick from and upload new files.
Next, give the field the Display name "Featured Image" and you'll see the Handle get slugified automatically to featured_image. This will be the variable name you will use in your templates to get the asset's data. The only additional setting you should tweak for now is to set Max Files to 1. When you're done, click Finish.
Head back to your Blog collection and edit an entry (or create a new one if you'd like). You'll see your new field right there. Upload any image you have on your computer. If you need a dummy image, we recommend Google Image Searching for "rad 90s aesthetic". That's a gold mine right there.
Hover over the thumbnail for your new image and click the Edit button (it looks like a pencil). There you can make a few adjustments to the image – like setting an Alt tag.
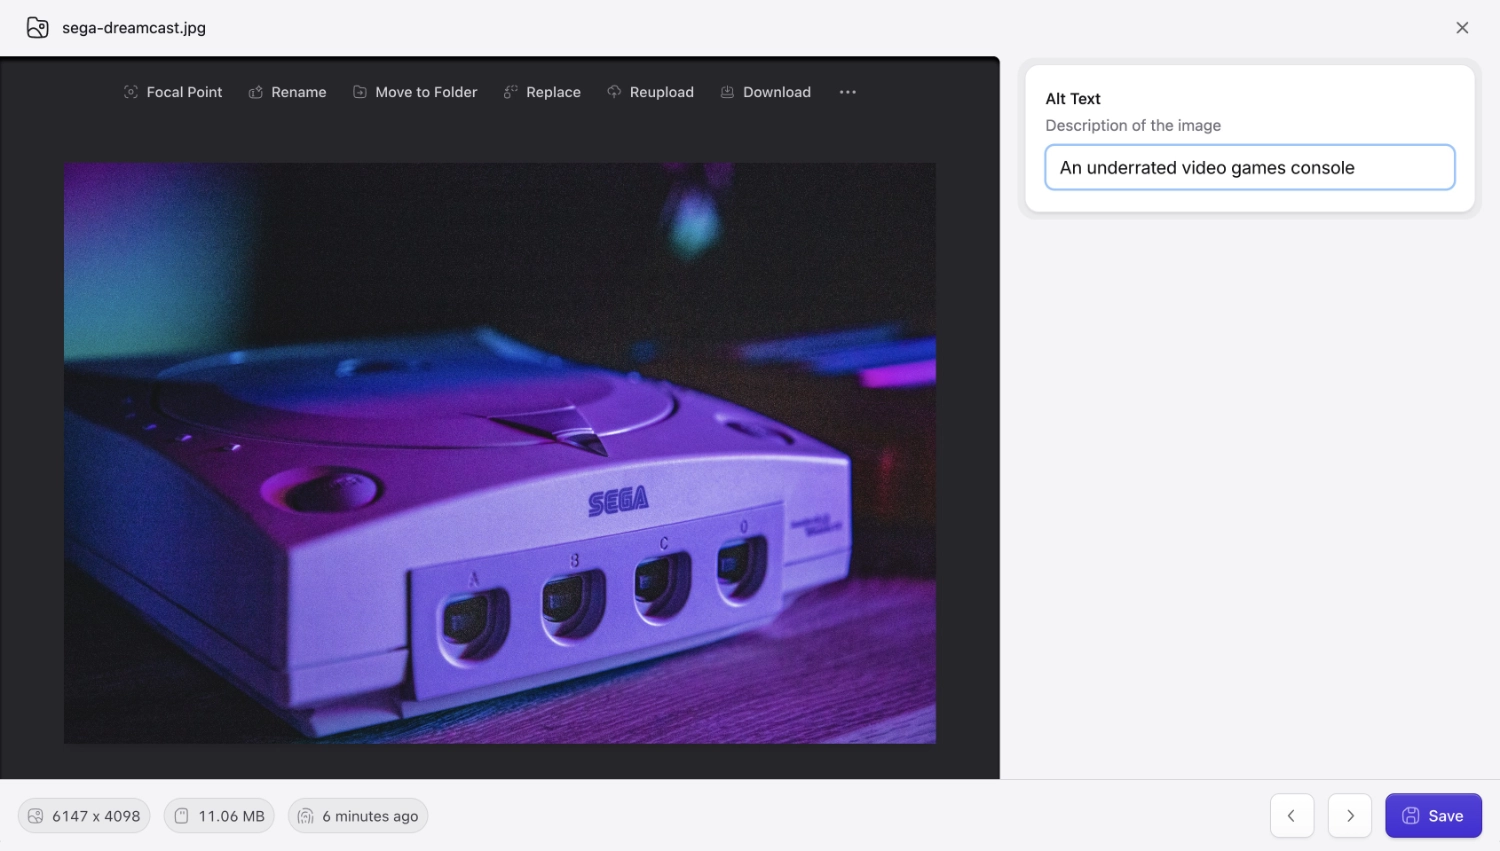
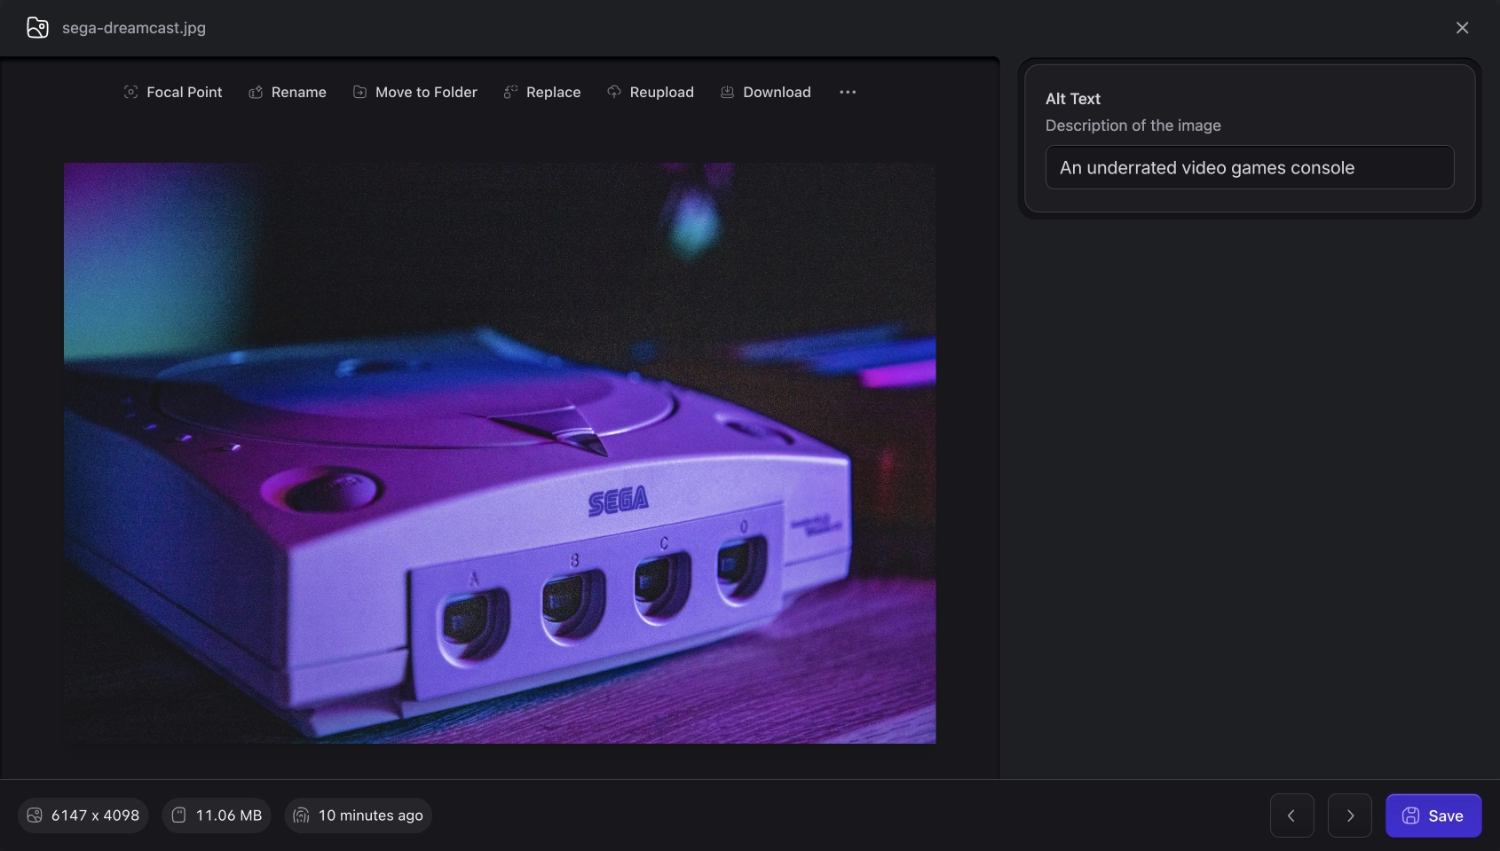
Assets can have Blueprints too!
When you're done, Save & Publish your changes.
Wiring up the new field#
Head back to resources/views/blog/show.antlers.html in your code editor. Add the following snippet anywhere you'd like in the template. Either before or after the {{ content }} variable is probably a good place.
// resources/views/blog/show.antlers.html
// ...

<img src="{{ featured_image }}" class="border-2 border-green-400 p-1" alt="{{ featured_image:alt }}" />
Refresh the page and there you have it — a basic but fully functional website. Hopefully you'll have a better idea how the basics fit together, as well as the relationship between the control panel and the frontend. There are so many more things you can do – like add Taxonomies, Forms, dynamic image manipulations, fetch data with JavaScript with our Content API and on and on.
And make sure to not miss the list of Tags and Modifiers that do all sorts of powerful things in your templates.
Going deeper#
We have a screencast series that covers getting started but goes much further and deeper. Feel free to check that out here. Good luck!
