

Glide Tag
The Glide tag makes it easy to manipulate images on the fly – from resizing and cropping to adjustments (like sharpness and contrast) and image effects (like pixelate and sepia).
Setting up Glide#
Glide is ready to go out of the box with no setup required. However, you may customize its behavior. You can read about it on the image manipulation page.
Basic Usage#
Manipulate images by passing an image source and adding the desired parameters like height, crop, or quality.
{{ glide src="image.jpg" width="1280" height="800" }}
<s:glide src="image.jpg" width="1280" height="800" />
/img/image.jpg?w=1280&h=800
The Glide tag outputs a URL of the transformed image, so you’ll likely want to use it as the src for an <img /> HTML tag.
<img src="{{ glide ... }}" />
{{-- Using fluent tags --}}
<img
  src="{{ Statamic::tag('glide')->src('test.png')->width(1280)->height(800)->fetch() }}"
/>

{{-- Using Antlers Blade Components tag pair --}}
<s:glide src="test.png" width="1280" height="800">
  <img src="{{ $url }}" />
</s:glide>
Sources#
There are a number of options when it comes to what you can use as an image source.
Asset#
You can pass along an asset object by using an asset field by reference:
{{ glide :src="asset_field" w="100" }} // /img/asset/6f75d8as?w=100
<s:glide :src="$asset_field" w="100" /> // /img/asset/6f75d8as?w=100
Relative path/URL#
You can pass a string of a path located within your public directory.
{{ glide src="image.jpg" w="100" }} // img/image.jpg?w=100
<s:glide src="image.jpg" w="100" /> // img/image.jpg?w=100
External URL#
You can pass a string of a URL on another site.
{{ glide src="http://anothersite.com/image.jpg" w="100" }} // /img/http/6f75d8as?w=100
<s:glide src="http://anothersite.com/image.jpg" w="100" /> // /img/http/6f75d8as?w=100
Tag Pair#
If you use the tag as a pair, you’ll have access to url, height, and width variables inside to do with as you wish.
{{ glide src="image.jpg" width="600" }}
    <img src="{{ url }}" width="{{ width }}" height="{{ height }}">
{{ /glide }}
<s:glide src="image.jpg" width="600">
  <img src="{{ $url }}" width="{{ $width }}" height="{{ $height }}">
</s:glide>
You may also use the tag pair to loop over multiple sources. For example, you may provide it with an assets field.
{{ glide :src="multiple_assets" width="600" }}
   ...
{{ /glide }}
<s:glide :src="multiple_assets" width="600">
  {{ $url }}
</s:glide>

{{-- Aliasing the results --}}
<s:glide :src="$multiple_assets" width="600" as="assets">
  @foreach ($assets as $asset)
    {{ $asset['url'] }}
  @endforeach
</s:glide>
The tag pair is also available as {{ glide:generate }}. You may need to use this version if you’re using Blade.

Normally, the Glide tag only generates a URL. The image itself is generated when the URL is visited. When using the tag pair, your Glide images will be generated when the page is rendered. This will result in an initial longer load time.
Shorthand Tag#
Rather than using the src parameter, you may choose to use a variable name as the second part of the tag.
{{ glide:my_var w="100" }}
<s:glide:my_var w="100" />
You may also use the shorthand as a tag pair:
{{ glide:my_var }} ... {{ /glide:my_var }}
<s:glide:my_var>
  ...
</s:glide:my_var>
Watermarks#
You may use Glide’s watermarking feature by passing in a source to the mark parameter, and then manipulate it using the various watermark parameters (markw, markh, markfit, markalpha, etc).
{{ glide src="image.jpg" mark="watermark.jpg" markw="30" }}
<s:glide src="image.jpg" mark="watermark.jpg" markw="30" />
You don’t need to worry about setting up a watermark filesystem yourself. Statamic will take care of that automatically based on the source you provide.
Usage in Blade#
To use the Glide tag within Blade, you can also use the generate tag, which follows the same rules as the tag pair.
@foreach (Statamic::tag('glide:generate')->src($source)->width(100) as $image)
  <img src="{{ $image['url'] }}" width="{{ $image['width'] }}" />
@endforeach
You should use a @foreach loop even if you are only providing a single source.
Focal Point Cropping#
Focal point cropping helps ensure the important bits of an image stay in the bounds of any crops you perform.
Using the focal point picker#
You can set focal points and zoom-levels for your images in the control panel using the asset editor. Use fit="crop_focal" while cropping to use an asset’s saved focal point, if it has one.
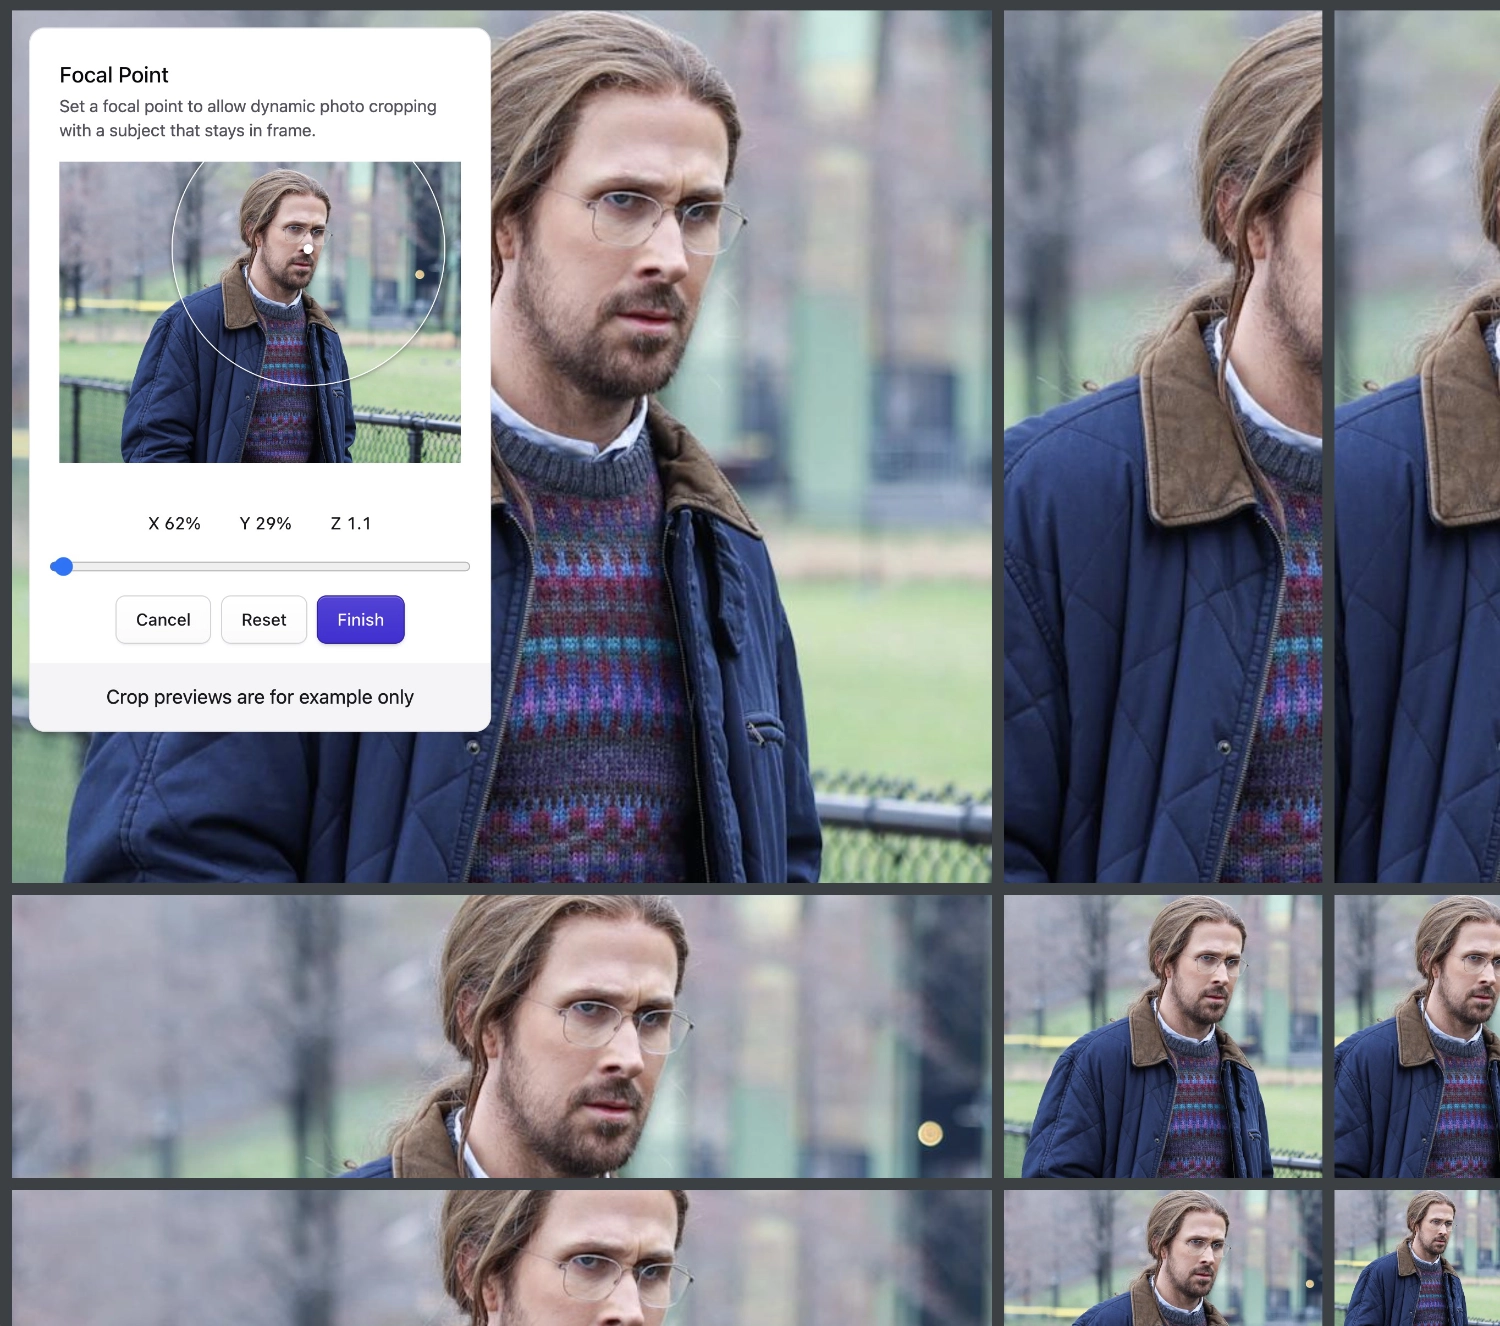
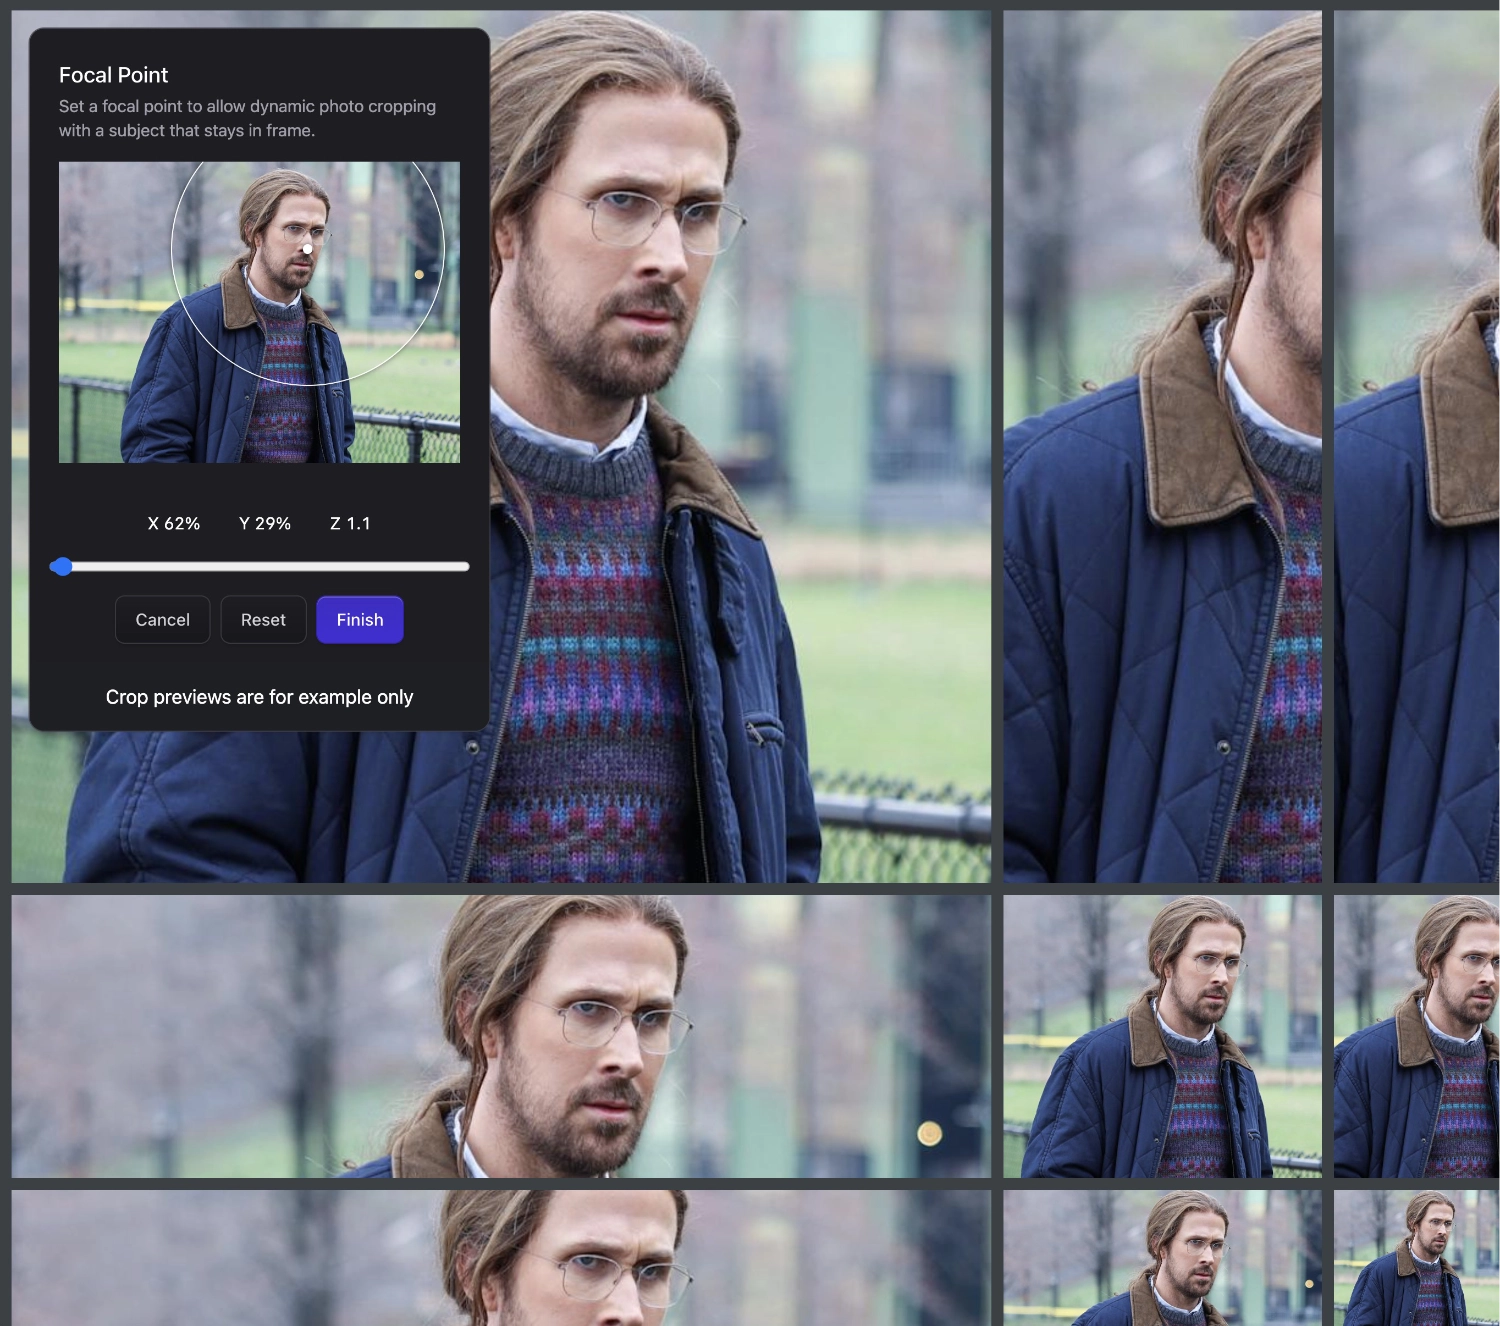
Manually setting focal points#
When setting focal points manually, specify two offset percentages: crop-x%-y%.
For example, fit="crop-75-50" would crop the image and make sure that the point at 75% across and 50% down would be the focal point.
If an asset doesn’t have a focal point set it will simply crop from the center.
Note: All Glide generated images are cropped at their focal point, unless you disable the Auto Crop setting. This happens even when you don’t specify a fit parameter. You may override this behavior per-image/tag by specifying the fit parameter as described above.
// config/statamic/assets.php

'auto_crop' => true,
focus_css#
You may use the focus_css variable to get an asset’s focal point in a format suitable for the background-position CSS property.
{{ focus_css }}
{{ $focus_css }}
50% 30%
Unsupported formats#
Glide will resize whatever images it supports, like jpgs or pngs. If you pass an unsupported type to Glide, like an svg, it’ll just return the unmodified URL.
images:
  - image.jpg
  - image.svg
{{ images }}
  <img src="{{ glide:url width="600" }}" />
{{ /images }}
@foreach ($images as $image)
  <img
    src="{{ Statamic::tag('glide')->src($image['url'])->width(600)->fetch() }}"
  />
@endforeach
<img src="/img/image.jpg?w=600" />
<img src="/assets/image.svg" />
Parameters
Size, Crop, and Output
width
Sets the width of the image, in pixels.
height
Sets the height of the image, in pixels.
square
A shortcut for setting width and height to the same value. For example square="250" is a shortcut for width="250" height="250".
fit
See the Glide docs on this parameter. In addition to the Glide's fit options, Statamic also supports crop_focal to automatically fit/crop to a predefined focal point. See the Focal Crop section for more details.
crop
Crops the image to specific dimensions prior to any other resize operations. Required format: width,height,x,y.
orient
Rotates the image. Accepts auto, 0, 90, 180 or 270. The auto option uses Exif data to automatically orient images correctly. Default: auto.
flip
Flips the image. Accepts v, h and both.
quality
Defines the quality of the image. Use values between 0 and 100. Only relevant if the format is jpg, pjpg or webp. Default: 90.
dpr
Defines the device pixel ratio. This makes it possible to display images at the correct pixel density on a variety of devices. For example the following would output an image of 400px {{ glide:image width="200" dpr="2" square }}. Default: 1. The maximum value that can be set for dpr is 8.
format
Encodes the image to a specific format. Accepts jpg, pjpg (progressive jpeg), png, gif, webp or avif. If using the imagick image manipulation driver, glide can additionally handle tif, bmp and psd. The default format: jpg
border
Adds a border to the image. Required format: width,color,method (comma-separated). Width is in pixels or a relative dimension; color follows Glide's color formats (defaults to ffffff if omitted); method is overlay (default), shrink, or expand. See Glide border docs.
Filters and Effects
bg
Sets a background color for transparent images.
blur
Adds a blur effect to the image. Use values between 0 and 100.
brightness
Adjusts the image brightness. Use values between -100 and +100, where 0 represents no change.
contrast
Adjusts the image contrast. Use values between -100 and +100, where 0 represents no change.
gamma
Adjusts the image gamma. Use values between 0.1 and 9.99.
sharpen
Sharpen the image. Use values between 0 and 100.
pixelate
Applies a pixelation effect to the image. Use values between 0 and 100.
filter
Applies a filter effect to the image. Accepts greyscale or sepia.
Other
preset
Applies a preset manipulation as defined in the config.
mark
The source of a watermark.
markw
The width of the watermark.
markh
The height of the watermark.
markfit
The fit of the watermark. See Glide docs
markx
How far the watermark is away from the left and right edges.
marky
How far the watermark is away from the top and bottom edges.
markpad
How far the watermark is away from all edges. A shortcut for using markx and marky.
markpos
Sets where the watermark is positioned. Accepts top-left, top, top-right, left, center, right, bottom-left, bottom, bottom-right. Default is bottom-right.
markalpha
Sets the opacity of the watermark. Use values between 0 and 100, where 100 is fully opaque and 0 is fully transparent. Default: 100. See Glide docs.
Variables
These variables are only available within the tag pair.
| Variable | Type | Description |
|---|---|---|
url |
string |
The URL of the resized image. |
width |
integer |
The width of the resized image. |
height |
integer |
The height of the resized image. |
asset data |
mixed |
If your source was an asset, you will also have all of its fields available. e.g. |
