

Antlers Templates
Antlers is a simple and powerful templating engine provided with Statamic. It can fetch and filter content, display, modify, and set variables, tap into core features like user authentication and search, and handle complex logic. Coming from Laravel and want to stick to Blade? We got you covered.
Overview#
Antlers is one of Statamic's foundational features. It consists of a tightly coupled template language, runtime engine, and library of Tags that can be used to fetch and manipulate data, handle logic, and help you write easier to maintain HTML.
Antlers templates are also called views. Any files in the resources/views directory with an .antlers.html file extension is an "Antlers Template", and will be parsed with the Antlers Engine.
The .antlers.html extension is important. Without it, your template will be rendered as unparsed, static HTML.

Basic example#
Antlers adds dynamic features to HTML in the form of "tags" – expressions contained inside a pair of curly braces: {{ and }} Those curly braces (often called double mustaches or squiggly gigglies) look a whole lot like antlers to us, hence the name.
This is a very simple Antlers tag:
{{ hello_world }}
Configuring#
You can configure advanced settings, like guarded variables, tags & modifiers in config/statamic/antlers.php.
// config/statamic/antlers.php
return [
    'guardedVariables' => [
        'config.app.key',
    ],

    'guardedTags' => [
        //
    ],

    'guardedModifiers' => [
        //
    ],
];
The book#
If you want to go beyond these docs and really dive into Antler's advanced capabilities, check out Antlers: Building Beautiful Websites with Statamic, the official companion book by the great John Koster.
The basics#
Delimiters#
There are three kinds of delimiters.
{{ }}The basic and primary delimiter pair, used to render variables, evaluate expressions, call Tags, and do almost all core Antlers things.{{? ?}}and{{$ $}}Allow you to write, execute, and echo PHP.{{# #}}Are for code comments.
Formatting rules#
- Each set of curly braces must stay together always, like Kenan & Kel or Wayne & Garth. There must be a left pair and a right pair, just like HTML's
<and>angle braces. - Expressions are case sensitive.
- Use underscores and not dashes to separate words in variable names.
- Whitespace between the curly braces expression is optional, but recommended for readability.
- You may break up an expression onto multiple lines.
Consistency is important. We recommend using a single space between braces and the inner expression, lowercase variable names, and underscores as word separators. Pick your style and stick to it. Future you will thank you, but don't expect a postcard.
This is great!
{{ perfectenschlag }}

This is allowed.
{{squished}}

This can make sense when you have lots of parameters.
{{
  testimonials
  limit="5"
  order="username"
}}

This is terrible in every possible way.
{{playSad_Tromb0ne            }}
We recommend indenting the markup in your HTML for human readability and maintainability, not for final rendered output. Anyone still caring about that this day and age probably needs a long vacation and strong Mai Tai or two. 🍹🍹
IDE integrations#
Syntax highlighting and auto-completion packages are available for many of the popular IDEs:
- Antlers Toolbox for VS Code (We recommend this one!)
- Antlers Toolbox for PhpStorm (Built by John Koster, creator of the current Antlers parser)
- Antlers for PHPStorm (IntelliJ IDEs)
- Antlers for Sublime Text
- Antlers for Atom
- Antlers for Panic Nova
Variables#
Data passed into your Antlers views can be rendered by wrapping the name of a variable with double curly braces. For example, given the following data:
---
title: DJ Jazzy Jeff & The Fresh Prince
---
The title variable can be rendered like this:
<h1>{{ title }}</h1>
<h1>DJ Jazzy Jeff & The Fresh Prince</h1>
Valid characters#
Variables must start with an alpha character or underscore, followed by any number of additional uppercase or lowercase alphanumeric characters, hyphens, or underscores, but must not end with a hyphen. Spaces or other special characters are not allowed. A valid variable name matches this regex [_A-Za-z][-_0-9A-Za-z]*[_A-Za-z0-9].
Don't be weird and mix-and-match them like a serial killer though:
<!-- Get outta here. -->
{{ this_iS-RiDicuL-ou5_ }}
Strings#
Strings (simple sequences of text) are one of the most basic data types. They come in the form of variables or static expressions. To render a string variable, wrap the name with double curly braces.
<h1>{{ title }}</h1>
Antlers also handles static expressions, which are useful when concatenating strings together, setting fallback or default values, combining with modifiers, and numerous other situations we can't think of right now but you may find yourself in eventually.
To render a static string, wrap it in single or double quotes, inside a pair of curly braces.
<h1>{{ "I will eat you, donut" | upper }}</h1>
<h1>I WILL EAT YOU, DONUT</h1>
Arrays#
An array is a collection of elements (values and/or variables). Elements inside the array may be iterated or looped through using the {{ value }} variable. You may also "reach in" and pluck out specific elements by their index.
Looping#
---
songs:
  - Brand New Funk
  - Parents Just Don't Understand
  - Summertime
---
<ul>
{{ songs }}
  <li>{{ value }}</li>
{{ /songs }}
</ul>
<ul>
  <li>Brand New Funk</li>
  <li>Parents Just Don't Understand</li>
  <li>Summertime</li>
</ul>
Next / previous#
While in a loop, you can get the respective iterations using the next or prev variables.
<ul>
{{ songs }}
  <li>{{ value }} (Next: {{ next:value }}) (Prev: {{ prev:value }})</li>
{{ /songs }}
</ul>
<ul>
  <li>Brand New Funk (Next: Parents Just Don't Understand) (Prev: )</li>
  <li>Parents Just Don't Understand (Next: Summertime) (Prev: Brand New Funk)</li>
  <li>Summertime (Next: ) (Prev: Parents Just Don't Understand)</li>
</ul>
Loop variables#
Inside any loop — whether you're iterating an array, the results of a tag like collection or taxonomy, or a relationship field — Antlers automatically exposes a handful of helper variables describing where you are in the loop.
| Variable | Type | Description |
|---|---|---|
first |
boolean | true on the first iteration. |
last |
boolean | true on the last iteration. |
count |
integer | The current iteration, starting at 1. |
index |
integer | The current iteration, starting at 0. |
total_results |
integer | The total number of items in the loop. |
no_results |
boolean | true when the loop has zero results. Available in tag loops. |
<ul>
{{ collection:blog }}
    <li class="{{ if first }}featured{{ /if }}">
        {{ count }} of {{ total_results }} — {{ title }}
        {{ if last }} (that's all, folks!){{ /if }}
    </li>
{{ /collection:blog }}
</ul>
These loop variables are an Antlers-only feature. If you're writing Blade, use Laravel's native $loop variable instead.
Plucking#
To pluck values out of an array, you may use "colon", "dot", or "bracket" notation to pull out values by their array key. All three of these syntaxes are equivalent, so feel free to use the one that feels most natural to you. Note that the first item of the array starts with a zero-index key.
---
sports:
  - BMXing
  - rollerblading
  - skateboarding
  - scootering
---
<p>Let's go {{ sports:0 }}, {{ sports.1 }} or {{ sports[2] }}.</p>
<p>Let's go BMXing, rollerblading, or skateboarding.</p>
Dictionaries#
Dictionaries are represented in YAML by nested key:value pairs, inside another variable name. These are sometimes called element maps, or associative arrays.
mailing_address:
  address: 123 Foo Ave
  city: Barville
  province: West Exampleton
  country: Docsylvania
You can access the keys inside the dictionary "colon", "dot", or "bracket" notation to traverse the levels of the array. All three of these syntaxes are equivalent, so feel free to use the one that feels most natural to you.
I live in {{ mailing_address:city }}. It's in {{ mailing_address:province }}.
Multi-dimensional arrays#
More complex data is stored in objects or arrays inside arrays. This is usually called a multi-dimensional array.
skaters:
  -
    name: Tony Hawk
    style: Vert
  -
    name: Rodney Mullen
    style: Street
  -
    name: Bob Burnquist
    style: Vert
If you know the names of the variables inside the array, you can loop through the items and access their variables.
{{ skaters }}
<div class="card">
  <h2>{{ name }}</h2>
  <p>{{ style }}</p>
</div>
{{ /skaters }}
<div class="card">
  <h2>Tony Hawk</h2>
  <p>Vert</p>
</div>
<div class="card">
  <h2>Rodney Mullen</h2>
  <p>Street</p>
</div>
<div class="card">
  <h2>Bob Burnquist</h2>
  <p>Vert</p>
</div>
You may also use "colon", "dot", or "bracket" notation to access individual values. Note that the first iteration of the array starts with a zero-index.
{{ skaters:0:name }}
{{ skaters.1.name }}<br>
{{ skaters[2]['name'] }}<br>
Tony Hawk<br>
Rodney Mullen<br>
Bob Burnquist
Dynamic access#
If you don't know the names of the keys inside the array – which can happen when working with dynamic or user submitted data – you can access the elements dynamically using variables for the key names.
Using the mailing list example, we could use a field variable to access specific keys.
---
field: country
mailing_address:
  address: 123 Scary Mansion Lane
  country: Docsylvania
  city: Arteefem
  postal_code: RU 7337
---
{{ mailing_address[field] }}

// Output
Docsylvania
You can combine literal and dynamic keys and get real fancy if you need to.
{{ complex_data[3][field]['title'] }}
Disambiguation#
As your templates grow and increase in complexity, you may find yourself unsure if you're working with a variable or a Tag. You may optionally disambiguate your variables by prefixing them with a $ dollar sign, just like PHP.
{{ $content }}
This includes variables that Statamic creates for you. For example on taxonomy pages, the terms are available in a variable named after the taxonomy. If you've named the taxonomy the same as a tag (like "section") then you will need to be clear you mean the variable and not the tag.
Modifiers#
Modifiers change the output of an Antlers variable. They are used inside any expression and are separated by a pipe character |.
Multiple modifiers can be chained on one output, each separated by another pipe |, and are are applied in order from left to right. Let's look at an example.
---
title: Nickelodeon Studios
---
<!-- NICKELODEON STUDIOS rocks! -->
<h1>{{ title | upper | ensure_right('rocks!') }}</h1>

<!-- NICKELODEON STUDIOS ROCKS! (order matters) -->
<h1>{{ title | ensure_right('rocks!') | upper }}</h1>
Some modifiers accept parameters to control their behavior. Arguments can be passed inside a pair of () braces, just like a native PHP function. If you don't have any arguments to pass, you may omit the braces.
You may pass strings, arrays, booleans, integers, floats, objects, or references to existing variables as arguments.
{{ var | modifier('hi', ['pooh', 'pea'], true, 42, $favoriteVar) }}
Examples#
Here are a few examples of modifiers in action.
summary: "It was the best of times, it was the worst of times."
noun: soups
{{ summary | replace('worst', 'yummiest') }}
{{ summary | replace('It was', 'It was also') | replace('times', $noun) }}
{{ summary | explode(' ') | ul }}
{{ (summary | contains('best')) ?= "It was lunch, is what it was." }}
It was the best of times, it was the yummiest of times.
It was also the best of soups, it was the worst of soups.
<ul><li>It</li><li>was</li><li>the</li><li>best</li><li>of</li><li>times,</li><li>it</li><li>was</li><li>the</li><li>worst</li><li>of</li><li>times.</li></ul>
It was lunch, is what it was.
There are more than 150 built-in modifiers that can do anything from array manipulations to automatically writing HTML for you. You can also create your own modifiers to do unthinkable things we assumed nobody would ever need to do, until you arrived.
You can even create Macros to combine sets of often used modifiers into one, new reusable one.
Creating variables#
You can now set variables by using the assignment operator, =.
{{ total = 0 }}

{{ loop from="1" to="9" }}
  {{ total += 1 }}
{{ /loop}}

<p>I can count to {{ total }}!</p>
<p>I can count to 9!</p>
Arrays#
You can also create arrays, if you find the need. Keep in mind that more complex data might be better suited to being managed in Entries, Globals, View Models, or Controllers.
{{ todo = ['Get haircut', 'Bake bread', 'Eat soup'] }}

<ul>
  {{ todo }}
    <li>{{ value }}</li>
  {{ /todo }}
</ul>
Sub-expressions#
You can assign sub-expressions or interpolated statements to variables too. In this example, you can use {{ items }} as if it were the actual Collection Tag. Because it is.
{{ items = {collection:products sort="rating:desc" limit="5"} }}

<h2>Our Top Products</h2>
<ul>
  {{ items }}
    <li><a href="{{ url }}">{{ title }}</a></li>
  {{ /items }}
</ul>
Truthy and falsy#
All variables are considered "truthy" if they exist and contain a value. Variables that don't exist, contain an empty string, or are structured and empty (e.g. an empty array or object) are considered "falsy".
This is a powerful pattern that can help keep template logic simple and uncluttered. For instance, you can set a series of "fallback" variables all in one expression, allowing you to have default values and optionally override them instead of having to do a bunch of if/else checks.
<!-- Which one is better? -->
<title>
  {{ if meta_title }}
    {{ meta_title }}
  {{ elseif title }}
    {{ title }}
  {{ else }}
    {{ site:name }}
  {{ /if }}
</title>

<!-- Don't be ridiculous, the answer is this one.  -->
<title>{{ meta_title ?? title ?? site:name }}</title>
Another use case is when you sometimes have an array variable to loop through in a template to render some markup. You may skip the existence check entirely, keep the markup inside the loop, and if the variable doesn't exist, nothing inside the tag pair will be rendered.
{{ nothing_to_see_here }}
  <!-- Doesn't matter, won't see it -->
{{ /nothing_to_see_here }}
Escaping#
By default, Antlers {{ }} statements are not automatically escaped. This is because in a CMS context (vs a web application), content is very often stored inside HTML markup, and this is the most logical, default behavior.
The simplest way to escape data is by using the sanitize modifier. This will run the data through PHP's htmlspecialchars() function to prevent XSS attacks.
{{ user_submitted_content | sanitize }}
Just remember: never render user-submitted data without escaping it first!
Operators#
An operator is a special symbol or phrase that you use to check, change, or combine values. For example, the addition operator (+) adds numbers, as in 1 + 2. Statamic supports many of the operators you may already know from PHP, and adds a few new ones to make your life as a developer easier.
Control flow#
Statamic provides a variety of control flow statements. These include if, else, or, unless, and switch statements to run different branches of template code based on defined conditions.
if#
Executes a block of code only if a condition is true or "truthy".
{{ if logged_in }}
  Welcome to Narnia!
{{ /if }}
You may also close if statements with {{ endif }} if you prefer.
unless#
Unless is the opposite of if – executing a block of code only if a condition is not met.
{{ unless logged_in }}
  You see a large wardrobe in front of you.
{{ /unless }}
You may also close unless statements with {{ endunless }} if you prefer.
elseif / else#
Adds more conditions with an if or unless block.
{{ if neighbor == "Kramer" }}
  These pretzels are making me thirsty!
{{ elseif neighbor == "Newman" }}
  Hello...Newman.
{{ else }}
  Who are you?
{{ /if }}
switch#
The switch is perfect for complex conditions with many possible cases, or using inside interpolated regions that don't support tag pairs, like Tag Parameters.
{{ size = 'lg' }}

{{ switch(
        (size == 'sm') => '(min-width: 768px) 35vw, 90vw',
        (size == 'md') => '(min-width: 768px) 55vw, 90vw',
        (size == 'lg') => '(min-width: 768px) 75vw, 90vw',
        (size == 'xl') => '90vw',
        () => '100vw'
    )
}}
(min-width: 768px) 75vw, 90vw
Comparison#
Comparison operators, as their name implies, allow you to compare two values or expressions.
| Name | Example | Description |
|---|---|---|
| Equal | $a == $b |
true if $a is equal to $b after type juggling. |
| Identical | $a === $b |
true if $a is equal to $b, and are of the same type. |
| Greater than | $a > $b |
true if $a is greater than $b. |
| Greater than or equal to | $a >= $b |
true if $a is greater than or equal to $b. |
| Less than | $a < $b |
true if $a is less than $b. |
| Less than or equal to | $a <= $b |
true if $a is less than or equal to $b. |
| Not equal | $a != $b |
true if $a is not equal to $b after type juggling. |
| Not identical | $a !== $b |
true if $a is not equal to $b, only if they are of the same type. |
| Spaceship | $a <=> $b |
Returns -1, 0, or 1 when $a is less than, equal to, or greater than $b, respectively. |
Examples#
Let's compare some numbers.
{{ if songs === 1 }}
  <p>This is a song!</p>
{{ elseif songs > 100 }}
  <p>This is noisy!</p>
{{ elseif songs }}
  <p>There are some songs here.</p>
{{ else }}
  <p>It is quiet.</p>
{{ /if }}
Here's a more complicated condition involving the output from a Tag.
{{ if {collection:count from="episodes"} >= 100 }}
  This show is ready to be syndicated!
{{ /if }}
Logical#
Logical operators join two or more expressions to create compound conditions.
| Name | Example | Description |
|---|---|---|
| And | $a && $b or $a and $b |
true if both $a and $b are true. |
| Or | $a || $b or $a or $b |
true if either $a or $b is true. |
| Not | !$a |
true if $a is not true. |
| Xor | $a xor $b |
true if either $a or $b is true, but not both. |
Ternary statements#
Ternary statements let you write a simple condition and return one value if true and another if false, all in one expression.
This item is {{ is_sold ? "sold" : "for sale" }}.
Ternary statements are a double-edged sword – they can simplify template code when used effectively, and greatly complicate it if pushed too far — like nesting one ternary inside another using a sub-expression. Make sure other developers will be able wrap their Mind Grapes™ around your ternary statements.
<!-- While valid, this can be hard to follow. -->
{{ is_sold ? "sold" : (on_sale ? "on sale" : "for sale") }}
Null Coalescence#
The null coalescing operator ($a ?? $b) considers each variable in a statement optional, returning the first one that passes a "truthy" check. This lets you set fallback or default values for optional data.
{{ meta_title ?? title ?? "Someone Forgot the Title" }}
Use ??? to fall through only on null. Keeps 0, false, '' intact.
{{ power_level ??? "It's over 9000!" }}
The Gatekeeper (Truthy assignment)#
The Gatekeeper operator (a ?= b) will execute an expression if and only if it passes a "truthy" check. It doesn't exist in any programming language — we invented this one. Enjoy!
{{ show_bio ?= author:bio }}

{{ show_newsletter ?= {partial:newsletter} }}
This syntax can handle any valid expression on the right-hand side of the operator. Just make sure that when using the Gatekeeper that it's the most readable way to construct the template.
Concatenation#
There are two methods for concatenating strings.
First, to concatenate and render a string in a single tag, you may use a + plus sign between variables and string literals to combine them. (You may also use multiple tags. Opt for whatever makes the code most readable.)
title: Marv's Coffee Shop
quality: pretty good
{{# These are equivalent #}}
<p>{{ $title + " makes " + $quality + " donuts." }}</p>
<p>{{ title }} makes {{ quality }} donuts.</p>
<p>Marv's Coffee Shop makes pretty good donuts.</p>
<p>Marv's Coffee Shop makes pretty good donuts.</p>
You may also concatenate through assignment, allowing you to render the result later in a template.
{{ string = "Hello" }}

{{ if something }}
  {{ string += " World"}}
{{ else }}
  {{ string += " Universe" }}
{{ /if }}

{{ string }}
Math#
Math is all the rage. Teenagers have been found in back rooms and back alleys doing math and nobody can seem to stop them. And since the cool kids are doing it, Antlers does math now too!
| Name | Example | Description |
|---|---|---|
| Addition | $a + $b |
Sum of $a and $b. |
| Subtraction | $a - $b. |
Difference of $a and $b. |
| Multiplication | $a * $b. |
Product of $a and $b. |
| Division | $a / $b. |
Quotient of $a and $b. |
| Modulo | $a % $b. |
Remainder of $a divided $b. |
| Exponentiation | $a ** $b |
Result of raising $a to the $b'th power. |
| Factorial | $a! |
Factorial of $a. |
Assignment#
The basic assignment operator is =. You might immediately think that means "equal to", but stop right there. Do not pass go and do not collect $200. This means left operand gets set to the value of the expression on the right.
This is how you create variables as well as increment, decrement, or otherwise manipulate numerical variables.
| Name | Example | Description |
|---|---|---|
| Left Assignment | $a = $b |
Sets the value of $a to the value of $b. |
| Addition | $a += $b |
Assigns the sum $a and $b to $a. |
| Subtraction | $a -= $b |
Assigns the difference of $a and $b to $a. |
| Multiplication | $a *= $b |
Assigns the product of $a and $b to $a. |
| Division | $a /= $b |
Assigns the quotient of $a and $b to $a. |
| Modulus | $a %= $b |
Assigns the remainder of $a divided by $b to $a. |
Self-iterating assignments#
The left assignment operator has a super power not shared by the others. If the value of the right-hand expression returns a value that can be iterated (arrays, objects, etc.), the captured variable name can be used as a tag pair to iterate the returned value immediately.
{{ pages = {collection:pages} }}
    {{ title }}
{{ /pages }}
Advanced operators#
These operators are here for the edge cases, the wild ideas, and the unexpected client requests at midnight the night before a site launch. These are the data wangjanglers.
Much of what they do is already handled by Modifiers or Tag Parameters (and you should use those if ever and whenever you can), but these operators become very useful as part of assignment expressions — when you've left the safety of a Tag or simplicity of a primitive variable in the dust behind you.
Merge#
The merge operator can merge two or more "array-like" variables or expressions. The resulting data is immediately iterable without any kind of intermediate step, if you desire.
{{ articles = favourite_articles merge not_favourite_articles }}

{{ articles }}
  {{# do your thing here #}}
{{ /articles }}

{{ items = {collection:headlines} merge {collection:news limit="5"} }}
  {{# your thing can be done here too #}}
{{ /items }}
You shouldn't need to merge collections this way because the Collection Tag already supports the feature (and is more performant), but we want to show what's technically possible.
{{ %collection from="headline|news" }}

{{ /%collection }}
OrderBy#
The orderby operator can be applied to any array and supports ordering by multiple properties as well as dynamic fields and directions.
Arguments are passed into a pair of parenthesis () in the following format, which accepts variables of literal 'asc' and 'desc' strings or boolean true and false for ascending and descending sort directions, respectively.
{{ var orderby (FIELD_1 DIRECTION, FIELD_2 DIRECTION) }}
Examples#
dir: 'asc'
shouldSortAscending: false
{{ people orderby (age 'desc', last_name 'asc', first_name 'asc') }}

{{ places orderby (state $dir, city $dir, zip_code $dir) }}

{{ things =
  {collection:hats} merge {collection:books}
  orderby (rating $shouldSortAscending)
}}
GroupBy#
The groupby operator can be applied to any array or tag output as part of an assignment expression, which automatically iterates through the newly created groups.
Arguments are passed into a pair of parenthesis (). Each argument accepts the name of a field to group by and an optional alias, with additional arguments for additional fields separated by commas ,. If you don't set an alias, it will match the name of the field you pass in.
Additionally you may set the name of the per-group values array with as 'anything_you_want' at the end of the expression.
groupby (FIELD 'KEY1', FIELD2 'KEY2') as 'things'
Examples#
We'll use the following data for a few of the next examples.
players:
  - { team: Chicago Bulls, name: Michael Jordan, position: Guard }
  - { team: Chicago Bulls, name: Scottie Pippen, position: Forward }
  - { team: Chicago Bulls, name: Dennis Rodman, position: Forward }
  - { team: Detroit Pistons, name: Isiah Thomas, position: Guard }
  - { team: Detroit Pistons, name: Terry Mills, position: Forward }
  - { team: Detroit Pistons, name: Joe Dumars, position: Guard }
Group by Single Field#
{{ items = players groupby (team) }}
   <h2>{{ key }}</h2>
   <ul>
       {{ values }}
        <li>{{ name }} - {{ position }}</li>
       {{ /values }}
    </ul>
{{ /items }}
<h2>Chicago Bulls</h2>
<ul>
  <li>Michael Jordan</li>
  <li>Scotty Pippen</li>
  <li>Dennis Rodman</li>
</ul>
<h2>Detroit Pistons</h2>
<ul>
  <li>Isiah Thomas</li>
  <li>Terry Mills</li>
  <li>Joe Dumars</li>
</ul>
Group by Multiple Fields#
{{ items = players groupby (team, position) }}
   <h2>{{ key:team }} - {{ key:position }}</h2>
   <ul>
       {{ values }}
        <li>{{ name }}</li>
       {{ /values }}
    </ul>
{{ /items }}
<h2>Chicago Bulls - Guard</h2>
<ul>
  <li>Michael Jordan</li>
</ul>

<h2>Chicago Bulls - Forward</h2>
<ul>
  <li>Scottie Pippen</li>
  <li>Dennis Rodman</li>
</ul>

<h2>Detroit Pistons - Guard</h2>
<ul>
  <li>Isiah Thomas</li>
  <li>Joe Dumars</li>
</ul>

<h2>Detroit Pistons - Forward</h2>
<ul>
  <li>Terry Mills</li>
</ul>
Group collection entries by year#
{{ blog = {collection:blog} groupby (date|format('Y') 'year') as 'entries' }}
  <h2>{{ year }}</h2>
  <ul>
    {{ entries }}
      <li><a href="{{ url }}">{{ title }}</a></li>
    {{ /entries }}
  </ul>
{{ /blog }}
Where#
Everything you can do inside a regular Antlers condition can be performed inside a where statement. Additionally, you can use an "arrow function" (x => x.field) to establish a scoped context inside an array or object.
Examples#
products:
  - [name: Talkboy, price: 30]
  - [name: Super Nintendo, price: 90]
  - [name: Pogs, price: 1]
budget: 50
{{ bulls = players where (team == "Chicago Bulls") }}
{{# returns [Michael Jordan, Scottie Pippen, Dennis Rodman] #}}

{{ afford = products where (x => x.price < budget) }}
{{# returns [Talkboy, Pogs] #}}

{{ electronic = products where
  (name == "Talkboy" || name == "Super Nintendo")
}}
{{# returns [Talkboy, Super Nintendo] #}}
Take#
You may use the take operator to limit the number of results returned from an assignment operation.
{{ players = players take (2) }}
Skip#
You may use the skip operator to skip a given number of results returned from an assignment operation.
{{ players = players skip (2) }}
Pluck#
If you would like to retrieve the values from a single field, use pluck.
{{ players = players pluck ('name') }}
  {{ value }}
{{ /players }}
Michael Jordan
Scottie Pippen
Dennis Rodman
Isiah Thomas
Terry Mills
Joe Dumars
The Terminator#
Multiple expressions or statements can be performed inside a single Antlers tag pair by terminating each with ;. These terminators can often lend to more readable code for multi-line statements. However, if you don't like them, you can tell 'em "hasta la vista, baby" because they're optional (just like in JavaScript).
{{
    $michael = 9986000;
    $minutes_in_a_year = 60 * 24 * 365;
    (($michael / $minutes_in_a_year) | format_number(0)) + " years";
}}
19 years
Expressions and statements#
If you want the computer science answer, an "expression" is a combination of values and functions that are combined and interpreted to create new values, whereas a "statement" is a standalone unit of execution that doesn't return anything. 🥱
Simply put, expressions show things and statements do things. Even more simply put — they're the stuff between {{ }} braces. It's not terribly important to remember the semantic differences as it is usually clear from context whether you're trying to show a thing or do a thing.
Let's just go through the list of valid "in between braces stuff" so you can accomplish your goals and hopefully win a trophy of some kind. 🏆
{{ "This is a single expression that renders this very text. Nothing more and nothing less." }}

{{# This statement fetches Entries and begins iterating through them #}}
{{ collection:blog limit="5" }}

{{# This statement runs a condition check #}}
{{ if template == "home" }}

{{# Brace yourself — this complex statement assigns a boolean value
    to a new variable based on a the result of a condition inside a
    sub-expression, and then writes a value to the user session in
    a separate statement, all inside a single Antlers region. 😅 #}}
{{ $show_sale_popup = (
    global:active_sale === true
    && !{session:has key="seen_popup"}
  );
  {session:set seen_popup="true"};
}}
Literals#
Literals are the simplest type of expression. They include strings, arrays, booleans, integers, and so on. Antlers can handle literals as stand-alone expressions, as arguments, and during assignments (creating and updating variables) .
To check the type of any variable or value, use the type_of modifier:
{{ "Wazzaaap" | type_of }}    -> string
{{ [1, 2, 3] | type_of }}     -> array
{{ false | type_of }}         -> boolean
{{ 42 | type_of }}            -> integer
{{ 26.2 | type_of }}          -> double (aka float)
Sub-Expressions#
Sub-expressions are indicated by wrapping a pair of parenthesis around () a portion of text. Anything inside a sub-expression will be parsed immediately and independently, which allows you to control the order of operations inside an Antlers tag and improve code readability.
{{ 5 + 3 * 2 }} -> 11
{{ (5 + 3) * 2 }} -> 16

{{ if (gallery | length) >= 12 && (content | read_time) > 5 }}
Sub-expressions are supported everywhere: variable assignments, logic conditions, interpolated Tag arguments, you name it.
Tags#
Tags (note the capital "T") are the primary method for accessing data from Statamic and tapping into many of the available dynamic features like search, forms, nav building, pagination, entry listing, filtering, image resizing, and so on. Check out the full list of Tags to see what's available.
Tags usually operate as pairs as they're often fetching data (like entries or assets) and looping through the results.
<ul>
  {{ collection:blog }}
    <li><a href="{{ url }}">{{ title }}</a>
  {{ /collection:blog }}
</li>
Disambiguation#
You may optionally disambiguate your tags by prefixing them with a % percent sign. If you're already disambiguating your variables, you may find this unnecessary, but it's here if you need it.
{{ %collection:blog }}
Tag parameters#
Most Tags can be configured through the use of Parameters, which accepts arguments — much like an HTML attribute. In following example, the SVG Tag is accepting a filename and string of classes to apply while rendering an inline <svg> element.
{{ svg src="icons/hamburger" class="w-8 h-8" }}
Tag Parameters are interpolated, so you can include variables and primitive forms of logic, using {single braces} instead of double. Avoid using tag pairs.
{{ nav from="{segment_1}/{segment_2}" }}
{{ collection:blog limit="{entry_limit ?? 10}" }}
You can use dynamic binding to pass the value of any variable by prefixing the parameter with a colon and using the name of the variable as your argument:
{{ nav :from="segment_1" }}
You can "void" a parameter using the void keyword. A voided parameter will act like you haven't used it at all. It's most useful when you may or may not need a parameter:
-{{ if wide }}                                  -    {{ svg src="hamburger" }}
-{{ else }}
-    {{ svg src="hamburger" class="w-full" }}
-{{ /if }}
+{{ svg src="hamburger" class="{wide ? 'w-full' : void}" }}
Shorthand parameter syntax#
When passing variables into tags where the parameter and variable have the same name, the standard syntax:
{{ collection:blog :id="id" }}
Can be simplified to this:
{{ collection:blog :$id }}
The parser will internally expand this to the longer form and continue as normal. This syntax can be mixed with normal parameters:
{{ collection:blog limit="5" :$class offset="1" }}
Self-closing tags#
Some Tags can function as single or paired expressions. For example, the Partial Tag can be used to include a partial template, or it can be used to wrap a portion of your template and inject it as a slot into a partial.
In the below example, you can self-close the first partial tag much like an HTML element to ensure the second tag is paired properly.
{{ partial :src="hero_panel" /}}
{{ partial :src="sidebar" }}
  <nav>
    <a href="/">Home</a>
    <a href="/about">About</a>
  </nav>
{{ /partial }}
Working with templates#
Layouts#
Most websites maintain the same general layout across various pages. Any markup you always want to present should go into a layout.
By default, Statamic uses /resources/views/layout.antlers.html, but you can create other layouts and configure specific entries or collections to use those instead by setting layout: your_layout on the entry or collection config file respectively.
Layouts often contain <head></head> markup, navs, footer, JavaScript includes, and so on. Somewhere in all that HTML you should add the {{ template_content }} variable — the place where content-defined templates will be injected.
<!-- resources/views/layout.antlers.html -->
<html>
  <head>
    <title>{{ title }} | {{ site:name }}</title>
    <link rel="stylesheet" href="/css/tailwind.css">
  </head>
  <body>
    {{ partial:nav }}

    {{ template_content }}

    {{ partial:footer }}
    <script src="/js/site.js"></script>
  </body>
</html>
Partials#
Statamic's {{ partial }} tag allows you to include a view from within another view. All variables that are available to the parent view will be made available to the included partial view.
{{ partial:footer }}
Even though the included view will inherit all data available in the parent view, you may also pass an array of additional data that will be made available to the included view:
{{ partial:blog/card mode="stacked" }}
If you attempt to use a partial that doesn't exist, Statamic will throw an error. If you would like to include a partial that may or may not exist (for example, using a variable in the partial name), you should use the {{ partial:if_exists }} tag.
{{ partial:if_exists src="blog/card" }}
All views inside your /resources/views/ directory can be used as a partial, including Blade views.
Slots#
Sometimes you might need to pass a large chunk of content into a partial. Jamming a bunch of HTML through a parameter would be like trying to shove a pizza through a donut. Entertaining, but futile.
Slots are the solution. By using the partial tag as a pair, everything inside will be passed into the partial, mapped to the {{ slot }} variable. Let's look at an example "modal" type of design component.
{{# /resources/views/partials/modal.antlers.html #}}

<div class="modal">
  {{ slot }}
</div>
We can now pass whatever we want into the slot by injecting content into the partial:
{{ partial:modal }}
  <h2>50% off everything, today only!</h2>
  <a href="/sale">
    <img src="/img/sale.jpg" alt="Man eating banana on sale." />
  </a>
{{ /partial:modal }}
Named slots#
Sometimes you might want to render multiple different slots in different locations inside a partial. Let's modify our example to allow of the injection of a "title" slot:
{{# /resources/views/partials/modal.antlers.html #}}

<div class="modal">
  <div class="modal-header">{{ slot:header }}</div>
  <div class="modal-content">
    {{ slot }}
  </div>
</div>
Now you can define the context of the named slot using the slot:name tag format. Any content not within an explicit slot:name tag will be passed to the partial in the slot variable.
{{ partial:modal }}
  {{ slot:header }}
    {{ svg src="icons/flag" class="w-4 h-4 mr-2" }}
  {{ /slot:header }}

  <a href="/sale">
    <img src="/img/sale.jpg" alt="Man eating banana on sale." />
  </a>
{{ /partial:modal }}
Stacks#
Antlers allows you to push template code to a "stack" which can be rendered somewhere else in your layout (most commonly) or another view. This can be particularly useful for specifying any JavaScript libraries required by your child views:
{{ push:scripts }}
    <script src="//unpkg.com/alpinejs" defer></script>
{{ /push:scripts }}
You may push to a stack as many times as needed. To render the complete stack contents, pass the name of the stack to the {{ stack }} tag:
<head>
  <!-- All that heady stuff here -->
  {{ stack:scripts }}
</head>
If you would like to prepend content onto the beginning of a stack, you should use the {{ prepend }} tag:
{{ push:scripts }}
    This will be second...
{{ /push:scripts }}

{{# Later... #}}

{{ prepend:scripts }}
    This will be first...
{{ prepend:scripts }}
Once#
The {{ once }} tag allows you to define a portion of the template that will only be evaluated once per rendering cycle. This may be useful for pushing a given piece of JavaScript into the page's header using stacks. For example, if you are looping through entries and rendering them with a partial, you may wish to only push the JavaScript to the header once, not every single time.
{{ collection:blog }}

  {{ once }}
    {{ push:scripts }}
      <script src="//unpkg.com/alpinejs" defer></script>
    {{ /push:scripts }}
  {{ /once }}

  {{ partial:blog/card }}

{{ /collection:blog }}
Section & Yield#
You may find that you wish to define areas of a layout that may need to change depending on which template is being rendered.
Let's peek at this basic layout as an example:
<html>
    <head>
        <title>{{ title }} / {{ site:name }}</title>
    </head>
    <body>
      <div class="container">
        {{ template_content }}
      </div>

      {{ yield:footer }}
        <footer>
          This is the main footer
        </footer>
      {{ /yield:footer }}
    </body>
</html>
Notice the yield tag. The contents of that tag will be rendered unless another template injects content into it using the section tag.
{{# /resources/views/landing/special.antlers.html #}}

{{ section:footer }}
  <p>Hi, I am a special footer! 👋</p>
{{ /section:footer }}
Prevent parsing#
You may find you need to prevent Antlers statements from being parsed. This is common when working with a JavaScript library like Vue.js, writing code examples, like we do in these docs. In either case, you have a few options.
The @ ignore symbol#
First, you may use an @ symbol on the outside of your curly braces to tell Antlers to leave it alone like a jellyfish on the beach. The @ symbol will be stripped out automatically leaving nothing but your full expression behind.
Hey, look at that @{{ noun }}!
Hey, look at that {{ noun }}!
The @ can also be used to escape individual braces within tag parameters or strings.
{{ partial:example attributes="class='@{font-bold: isImportant@}'" }}
// attributes="class='{font-bold: isImportant}'"
{{ "string @{foo@} bar" }}
// "string {foo} bar"
Ignoring Tag parameters#
You may ignore the contents of tag parameters by prefixing the parameter with a backslash. This could be useful allow you to avoid having to escape each curly brace like the example above if you are providing some JS/JSON in a parameter:
{{ form:create \x-data="{ submittable: false }" }}
The noparse Tag#
Use this method if you need to prevent entire code blocks from being parsed.
{{ noparse }}
  Welcome to {{ fast_food_chain }},
  home of the {{ fast_food_chain_specialty_item }},
  can I take your order?
{{ /noparse }}
Using Antlers in content#
Antlers template code inside your content is not parsed automatically for security and performance reasons.
You may enable Antlers parsing on a per-field basis by setting antlers: true in a given field's blueprint config.
Opting into tags and modifiers#
When Antlers parses content (fields with antlers: true, or anything run through Antlers::parse()), it runs in a hardened mode that disables PHP syntax and restricts which tags and modifiers are available. This is not the same as a regular .antlers.html view — views still get the full, unrestricted Antlers experience.
What's allowed by default#
Out of the box — with the allowedContentTags and allowedContentModifiers keys unset (the default shipped state) — you get:
Default tags:
link:*obfuscate:*trans:*trans_choice:*widont:*- Any tags you've created in your own
App\Tags\namespace (auto-allowed)
Default modifiers: The broad set of safe built-in modifiers, including:
markdownsanitizeupperlowerformatwhereexcerptnl2brslugify- ~150 others
- Custom modifiers in your
App\Modifiers\namespace (auto-allowed)
The full list lives in Statamic\Providers\ViewServiceProvider::defaultAllowedContentModifiers().
The defaults are deliberately narrow. Any tag that can fetch or expose site data is excluded, because a content author typing {{ collection from="private_drafts" }} or {{ users }} into an antlers: true field could otherwise "leak" data they they may or may not be entitled to. If you want those tags in content, opt in explicitly.
Common tags you may want to opt into#
These aren't on by default — add them to allowedContentTags if your editors need them:
| Tag | Why it's not default |
|---|---|
collection:* |
Fetches entries from any collection |
taxonomy:* |
Fetches terms from any taxonomy |
nav, structure:* |
Fetches navigation trees |
users:* |
Fetches user data |
form:* |
Fetches form fields and submissions |
assets:*, asset:* |
Fetches assets from any container |
glide:* |
Image manipulation (generally safe, just not in the default set) |
search:* |
Runs search queries |
get_content, get_files |
Arbitrary data fetching |
relate:* |
Follows relationships |
Extending or replacing the defaults#
If you need to allow additional tags or modifiers (like {{ glide }} or {{ nav }}), opt into them via config/statamic/antlers.php. Use the @default token to keep the defaults and add to them — without it, your array replaces the defaults entirely:
// config/statamic/antlers.php
return [
    'allowedContentTags' => [
        '@default',     // keep the built-in defaults
        'glide:*',      // allow {{ glide }}, {{ glide:src }}, etc.
        'nav',          // allow just {{ nav }}
    ],

    'allowedContentModifiers' => [
        '@default',     // keep the built-in defaults
        'my_custom',
    ],
];
Tag entries are patterns — append :* to allow the tag and any of its parameters/sub-tags (glide, glide:src, glide:generate, etc). Modifier entries are exact handle matches.
Allowing config values#
Referencing config in content fields (e.g. {{ config:app:url }}) goes through a separate allowlist. Statamic's @default list covers the common safe keys. If you're pulling a custom key, or chaining modifiers onto a config value, add it to view_config_allowlist in config/statamic/system.php:
// config/statamic/system.php
'view_config_allowlist' => [
    '@default',
    'app.url2',
    'services.stripe.key',
],
Code comments#
Antlers code comments are not rendered in HTML (unlike HTML comments), which allows you to use them to "turn off" chunks of code, document your work, or leave notes and inside jokes for yourself and other developers.
{{# Remember to replace the lorem ipsum this time, Karen! #}}

{{#
  <h1>{{ title }}</h1>
  <div>{{ date }}</div>
  <div class="markdown">{{ content }}</div>
#}}
Using PHP in Antlers#
You can write PHP inside special delimiters. You may use {{?...?}} to write raw PHP and manipulate the current context (variables that exist in a given request), and {{$...$}} to echo the result of a PHP expression and render HTML.
Syntax#
The following two syntax examples are functionally equivalent, but each uses a different approach based on the delimiter.
{{? $register = route('account.register'); ?}}

<a href="{{ $register }}">Register for a new account</a>
<a href="{{$ route('account.register') $}}">Register for a new account</a>
Accessing Data in PHP#
Data in the Cascade can be accessed in much of the same way it is inside of a regular Antlers expression.
<h1>{{? $page->title ?}}</h1>
<p>{{? $globals->get('company_address') ?}}</p>
PHP File Extension#
You can also change your view's file extension from .antlers.html to .antlers.php and you can write all the raw PHP you want using native PHP tags.
<?php
  echo 'Keep it simple, please';
?>
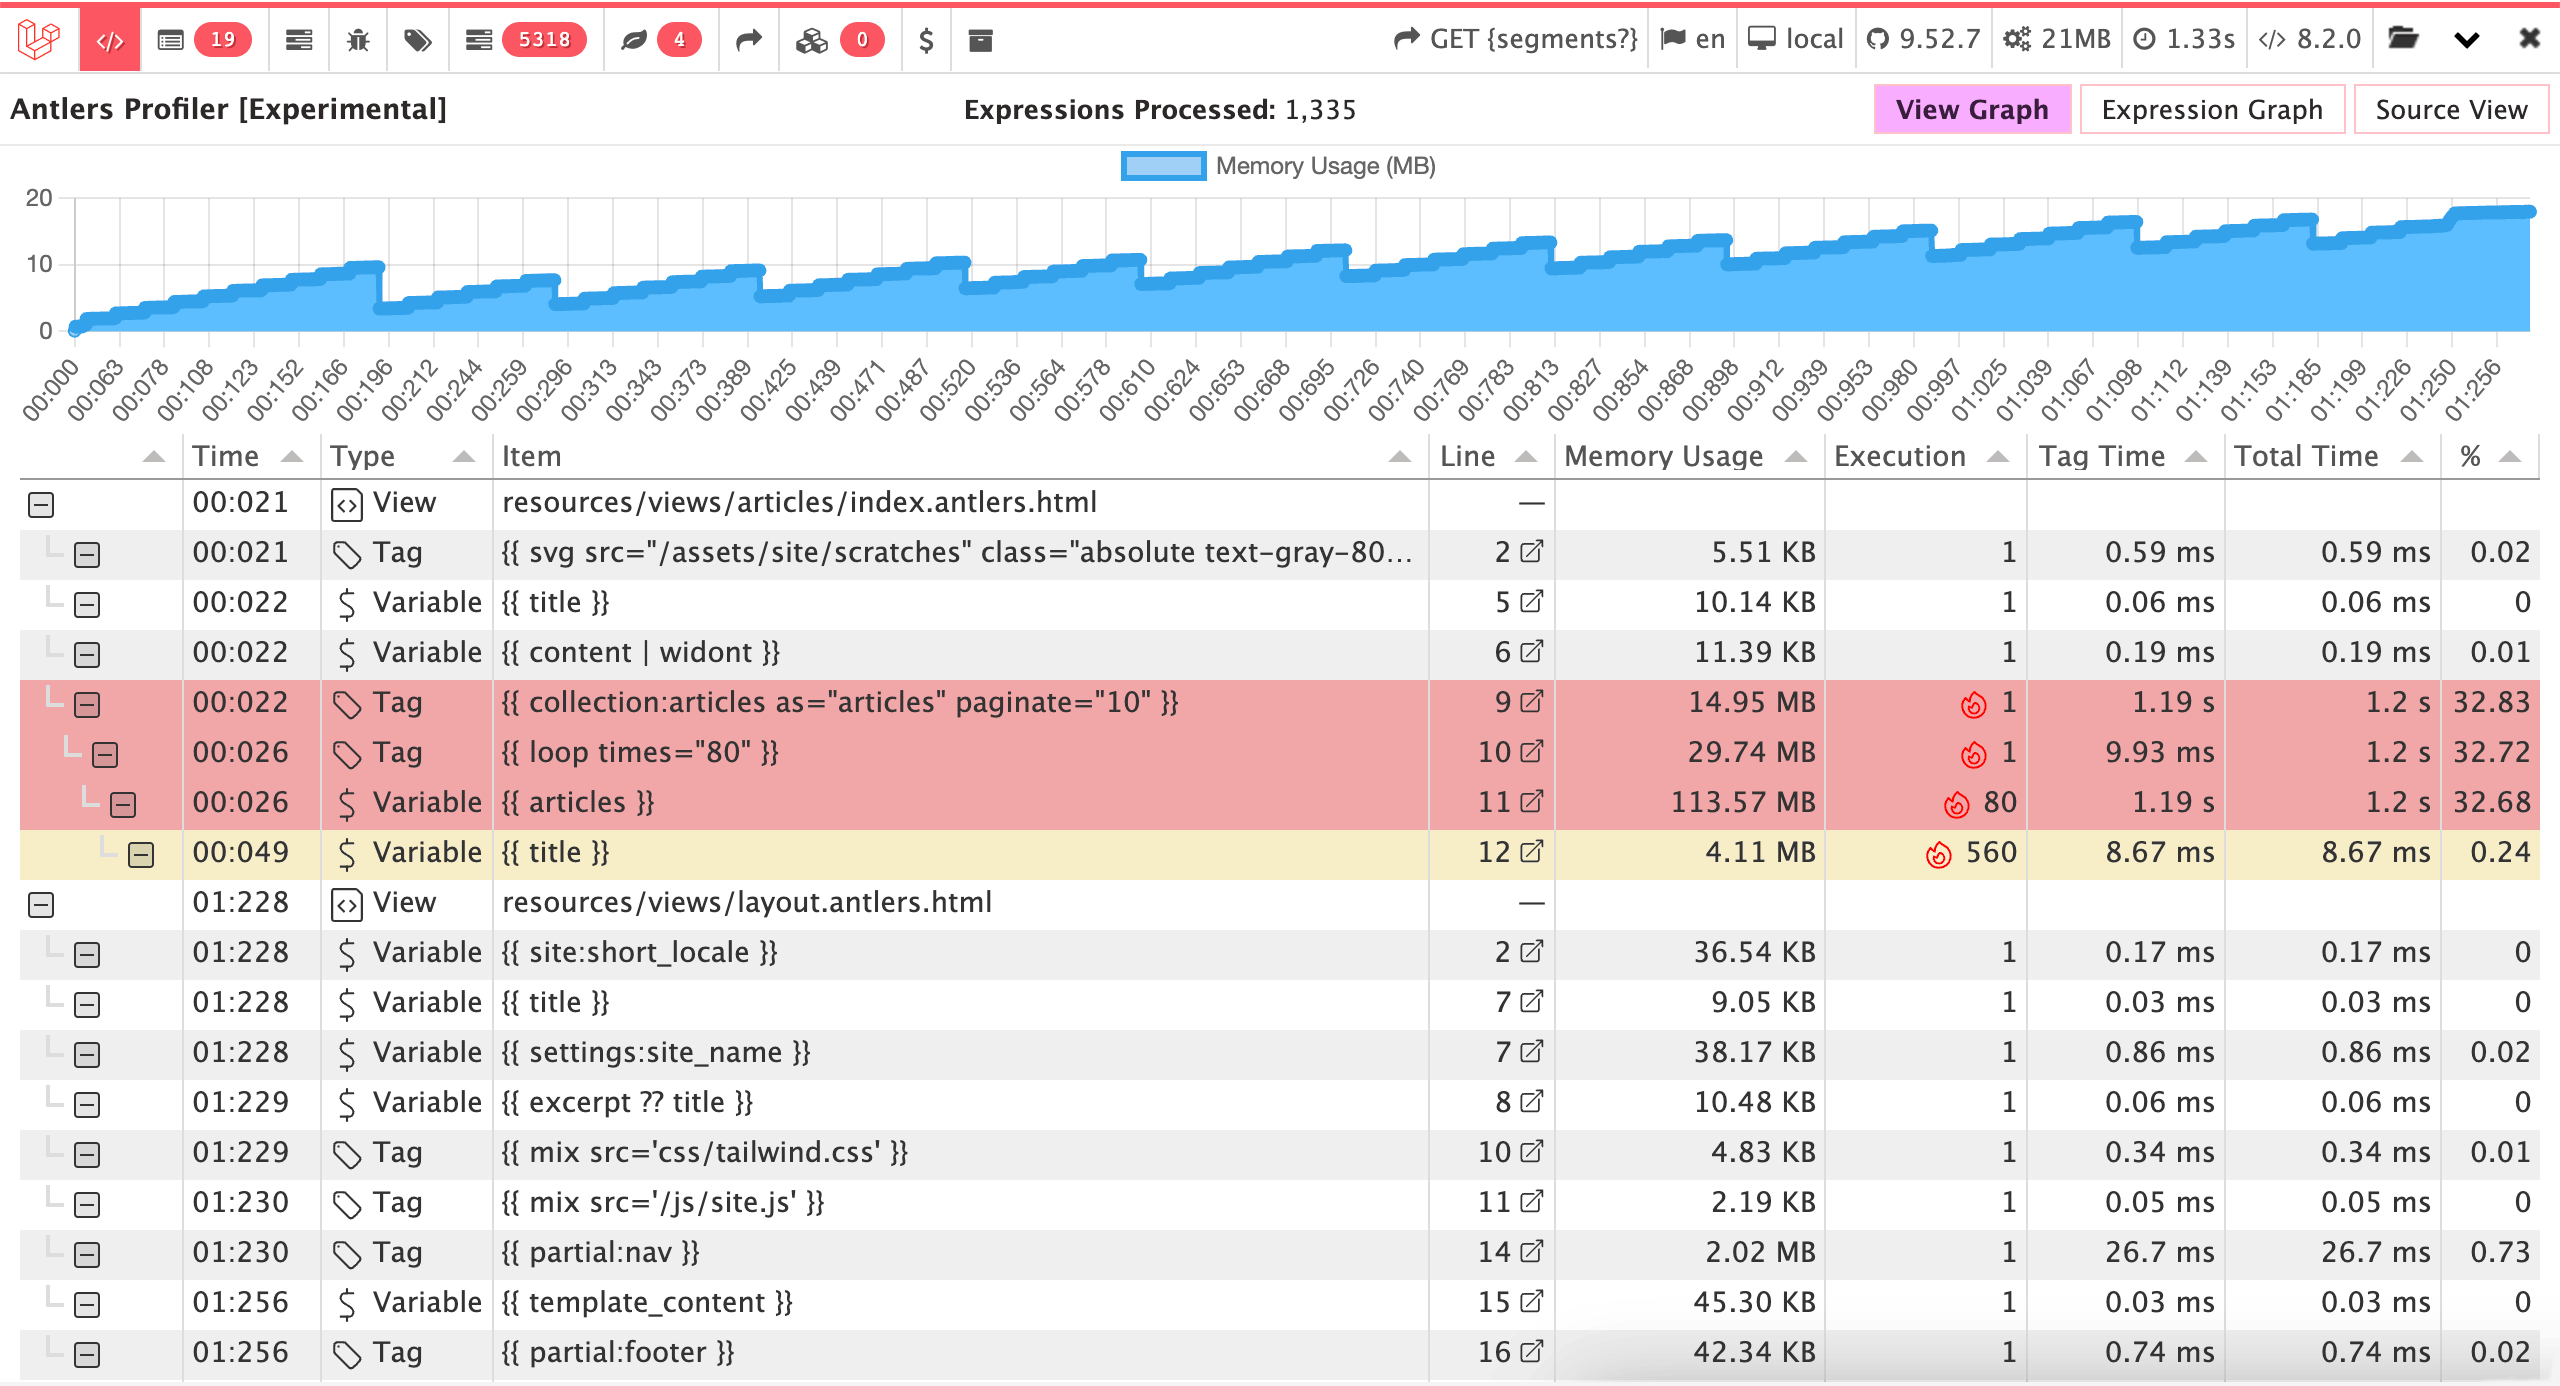
Debugbar profiler 🎊#
Antlers has an experimental new Profiler tab in the Debugbar that helps you see the performance impact of all of your template code.
Inside this Profiler there are 3 separate views that give you different glimpses into your site.
View graph#
This view groups your Antlers expressions by the view files (templates, layouts, and partials) they exist in, allowing you to more easily tease out the location of any potential slowdowns or redundant calls.
Each parsed expression in this view gets its own row in the table that shows various metrics and details that may prove to be useful.
Expression graph#
This view shows all parsed expressions in a given request, listing them in execution order.
Each parsed expression in this view gets its own row in the table that shows various metrics and details that may prove to be useful.
Source view#
The Source View shows the final rendered template and highlights any content rendered by Antlers with a color corresponding to how fast it was executed. Green is fast, Yellow is a little slow, and Red is very slow.
Profiler columns#
| Column | Explanation |
|---|---|
| Time | Starting from 00:00, exactly when on the timer this expression was run. This helps to see the order your code is executed in. |
| Type | Shows whether the expression is an imported view, a variable, or a Tag. |
| View Path | When using the Expression Graph, shows the path to the view file the expression exists in. |
| Line | Shows what line the expression is in. If you have configured the debugbar by publishing its config and have specified which code editor you use, you can click the line and open your editor straight to this bit of template code. |
| Memory Usage | How much memory was used to execute this expression. |
| Execution | The number of separate times the expression was executed. |
| Tag Time | The amount of time it took to run the expression |
| Total Time | The amount of time it took to run the expression along with any child expressions (e.g. a tag pair) |
| % | The percentage of total load time dedicated to run this expression. |
How to use the profiler#
If you have some pages in your site that are running slow, the Profiler can help you narrow down and find bottlenecks in your template code. Look for anything colored — yellow, orange, and red all may point to some logic that is performing extra slow.
Slow expressions don't necessarily mean that Antlers is slow at parsing them, but rather Statamic is doing a lot of work in order to fetch, filter, and/or manipulate your data to render your view.
With this information you can look for opportunities to cache bits of your template, open support requests and get clarification, ask questions in Discord, or pop the hood on your custom code to see what the hold up is.
This feature is new and experimental! It's recommendations and "slow code" thresholds may need to be updated after getting more real world data.
Even more advanced stuff#
John Koster's blog is full of really useful tips and tricks covering some really advanced features not documented here. Be sure to check it out!
Thank you to John Koster 👏#
This Antlers parser was a huge rewrite by the incomparable John Koster, who apparently found it a relaxing break from his day job. You can see the effort involved in this massive PR.
We owe him a debt of gratitude for this amazing gift.
